**Note** This guide is virtually identical to the debricking guide for the WNR3500L (v1) with some minor changes. For more information, see our guides for debricking the WNR3500L on Ubuntu and Mac, as well as a Linux/minicom specific guide for the v2.
So you've gone and done it... you've bricked your WNR3500Lv2. Nothing sinks the spirits like constantly flashing lights and endless reboot loops. However, don't lose hope or get frustrated - there's a solution to your woes, and it's called a serial console.
Before you think that this is too complicated for you, read on. It's actually quite simple, but there are several steps involved that require completion exactly as stated. Remember, you perform these steps at your own risk, but rest assured that I have followed these exact steps to great success and that you should be able to duplicate them. The instructions that follow are for use on Windows systems.
Materials Needed

- 1x Bricked WNR3500Lv2
- Ethernet cable
- Windows PC/Laptop
- Installed TFTP client (Windows XP, 2000, and 7 have this built in. Otherwise, see step 10 for installation instructions/links)
- Teeny tiny screwdriver or similar implement
- Electrical tape (Optional, but recommended)
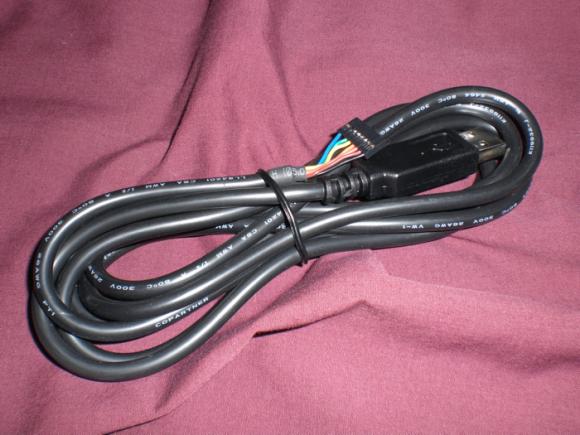
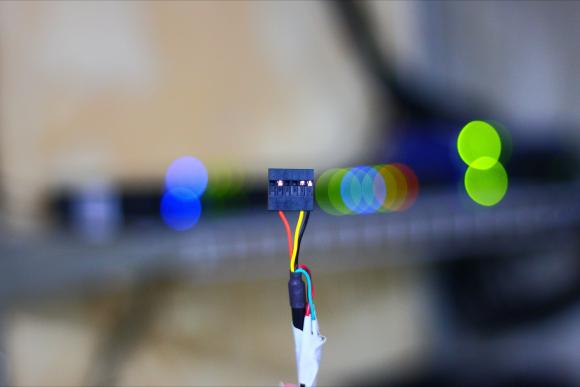
- USB-TTL Cable from FTDI. You can purchase one of these from Mouser Electronics. Ensure that you have model TTL-232R-3V3 specifically, or you can fry your router! See photo above.
- Torx T6 or T7 screwdriver
- Thin flathead screwdriver (Optional, but recommended)
- NETGEAR Original Firmware for the WNR3500Lv2 (Download from here and put into your C: drive).
- Patience. Some of these steps may take multiple attempts.
Step 1: Crack Open the Router

Well, don't literally crack it, unless you want a broken router! It's pretty easy to open, but be careful. Use the Torx screwdriver to remove the two screws on the bottom of the unit first.
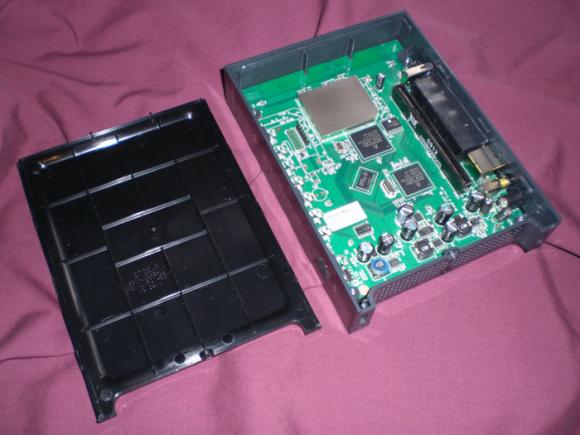
Now, you will have to unsnap the case from the router. In the photo, look closely at the router's casing. You may be able to see the tabs on the left and right side. The panel you need to remove is the "top" panel - look at the back of the router and turn it so the text is right side up. The top panel, when the router is situated this way, is the one you should need to remove. Gently put your screwdriver (preferably flathead) in the seam and disconnect these tabs. Once you are able to slide the case off, put the router aside for now.
Note: The first time removing it, I needed the screwdriver to pry it loose, but on subsequent tries I discovered that the case "slides" and snaps into place. Try various methods to find what works best for you. You may not need an implement to unsnap the tabs at all, if you're lucky!
Step 2: Download PuTTY Program and Install
PuTTY is the nifty, free little program that you will use to program the router, also known as a serial console. Download it from here, and install it using the self-installing executable.
Step 3: Download Cable Drivers and Install
Now, you'll need to download the drivers for your USB-TTL cable. In a nutshell, this cable "converts" the USB interface of your PC to a serial output that the board of the WNR3500L can understand, so you can communicate directly with the board (i.e., not over your network.)
Download the proper driver for Windows from here and install it. A reboot is not required, but recommended.
Step 4: Give your PC a Static IP Address
This step is to ensure that you will be able to communicate with 192.168.1.1, the default address of the bricked router.
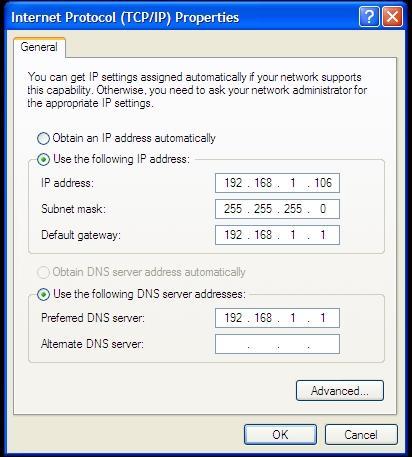
Head to Control Panel => Your Internet Connection => TCP/IP => Properties and change your IP address as shown above. Make sure it does not end in .1, .x1, or .xx1.
Step 5: Plug in Ethernet from Router to PC
Note: Do NOT connect the power to the router just yet.

Connect the Ethernet cable you have in your possession to an orange port on the WNR3500Lv2 to the Ethernet port on your PC. Note that it must be an orange port, NOT the yellow port... it won't work otherwise. At least, it didn't for me.
[[page]]
Step 6: Modify the USB-TTL Cable for Use with WNR3500Lv2
Take a look at the photo above. See how each of the leads is covered by a small plastic tab? Bust out your tiny screwdriver or whatever it is that you have that's tiny, and pry off the tabs on the black, yellow, and orange leads only. If you choose to remove all six, you will need to wrap up the unused leads in electrical tape to avoid shorting anything out. Once you pry the tabs off, the leads that you will be using will slip out easily. Now, you can plug the leads in directly. (Note that you can also do the opposite of this, and leave the proper leads in while removing the others, meaning you can plug the whole harness into the router. Whichever you prefer.)
Step 7: Find Out What COM Port Your Cable is Using
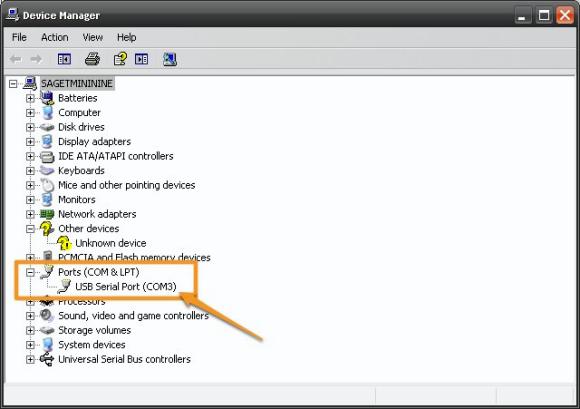
You installed the cable driver in step 3, right? If so, head on over to Control Panel => System => Hardware => Device Manager, and click on the "Ports" item as shown in the photo above. Note the "USB Serial Port" item with a designation of "COM3." You'll use this information in the next steps. If you don't see that, plug in the cable and the Device Manager should refresh.
Step 8: Connect the USB-TTL Cable to the WNR3500Lv2
Note: Make sure the router is still powered off and unplugged from power when you do this. Don't touch anything metal either, don't want to take any risks of shock or shorting anything out, which is always a potential concern when tinkering with open electronics.
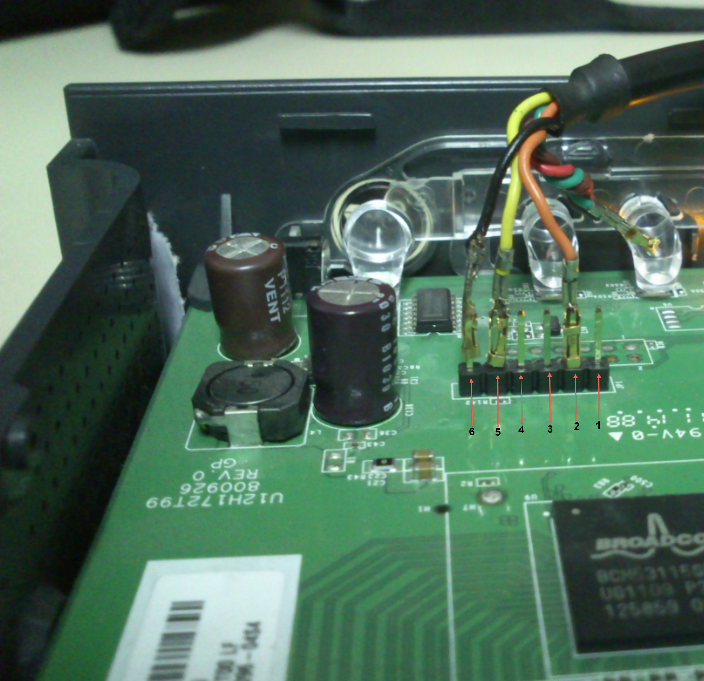
This part is particularly important, as if you don't connect these cables properly it will be very frustrating for you! Take a close look at the photo above. On the pinout on the board, you will see six pins. Next to one pin it will read "JP1." That is actually Pin 6. Pin 1 is labeled with a "1" next to it. Connect the cables as follows and as shown in the photo:
Black => Pin 6 (next to JP1)
Yellow => Pin 5
Orange => Pin 2
Step 9: Configure and Launch PuTTY
Hanging in there? Do you feel like a geek yet? It should feel good :)
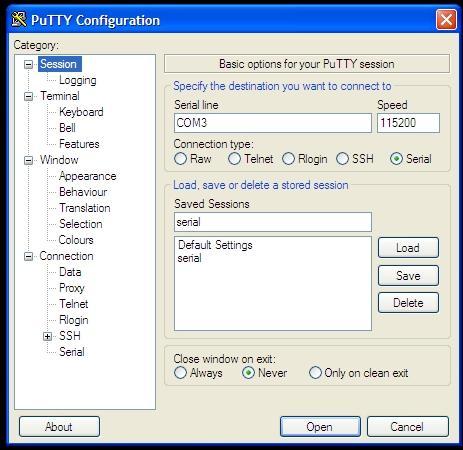
Fire up PuTTY and you'll see the screen above. Select the exact options as shown above; click on the Serial radio button, the port to COM3 (or whatever port was revealed in Step 7) and the speed to 115200.
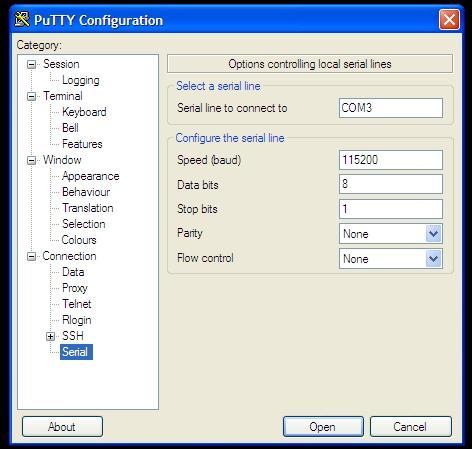
Then, click on the very last item in the menu and choose the options above. They must be exact: serial line of COM3, speed of 115200, Data bits of 8, Stop bits of 1, and "None" for both parity and flow control. Once you are confident these settings are correct, click "Open," and you will see a blank window with a green cursor. Nothing is supposed to be happening in there yet, so don't fret.
Step 9: Power on the WNR3500Lv2 and Press Ctrl-C
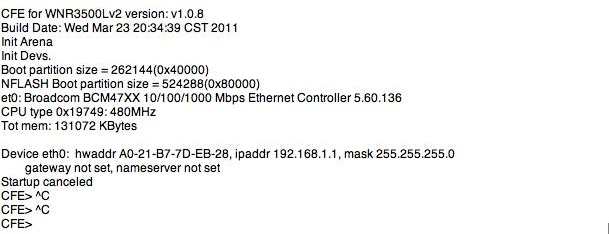
Now, you can finally connect power to the router. Press in the power button and immediately press Ctrl-C on your PC, with the PuTTY window active. This will bring you to what is called the CFE console; essentially, you're interacting directly with the board. If this does not happen, double and triple check all of the previous steps.
 Then, type in "tftpd" (without quotes) to bring up what is called the TFTP interface. This will ready the router for programming. If this step performed properly, you'll be left with the screen above. Almost there...
Step 10: "Put" The Firmware Into Your WNR3500Lv2 In The DOS Prompt
Note: If you are on Windows 2000, XP, or 7, you have a TFTP client built in. (Note that it does have to be enabled, however. Some easy instructions can be found here.) However, if you're on Win95, 98, Me, NT, or Vista - you do not.
Instructions for installing TFTP on Windows Vista can be found here.
Here is one open source TFTP client for Windows that you can try.
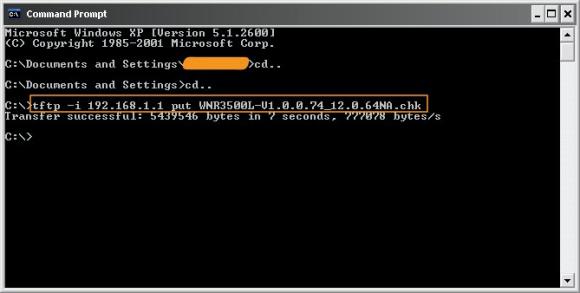
Assuming that you have TFTP installed in some form, zoom on over to your DOS prompt. You copied the original NETGEAR fimware to your C: drive, correct? Good. Type "cd.." without quotes as shown above to get to your root directory, then type this command:
tftp -i 192.168.1.1 put FIRMWARE_FILE.chk
When you do this, the TFTP command will send the firmware file you indicated to the router, and you will get a confirmation as shown above. If this doesn't work, make sure your router is connected to your PC properly, you have a static IP that doesn't end in 1, and that you can ping the router.
If this command is successful, your PuTTY console will start to get some action, and it will re-program the router. Allow this process to finish, it will take several minutes, and wait until it is COMPLETELY finished or you will get a bad flash. And nobody wants a bad flash! You'll get a lot more text than is displayed above, but when it's done, you can try accessing your router's GUI via http://192.168.1.1. You will need to enter the "standard" username and password, consult your user manual for this information. (At the time of this writing, "admin" and "password" were used.)
Step 11: Rejoice and Relax... or troubleshoot
Hopefully, not the latter, but unfortunately things don't always go as planned. If you're struggling with this procedure, have an unsolvable problem with your WNR3500Lv2, or are on another OS let us know.
You can post your questions on the public forums or as a comment below!
Hello!
This should work providing these two things are confirmed. One is that the up to date drivers are selected and downloaded. FTDI makes them available without any problems.
Second is that these cables are configured to fit the connectors used as audio hardware connectors for sound cards and other multimedia gear inside the PC. Therefor it should be possible to create a breakout board that the would mate the output end of the FTDI cable to the other end that the user plans on connecting to the router. That one can be broken apart to accommodate the router.
(Incidentally you might remember me from the Pogoplug forums next door. I have a dual specialty, embedded hardware, and regular electronics.)
Oh right that should also include that the links for FTDI happen to be, http://www.ftdichip.com and of course Putty can be easily found.
My WNR3500Lv2 don't get past the line "Starting program at 0x80001000".
And no replay on ping.
What can i do?
Which firmware were you about to flash ??
My WNR3500L V2 is debrick.
When ever the ground is connected to pin 6 as in the picture, the router does not boot (the green power light just glows dimly)
If I connect only the ground, it boots, but I cant do any combination of ground and rx or tx
if I only connect the rx and tx pins, it boots fine but nothing happens on the console.
(this is a wnr3500l v2
please help me !!!!! thank you ~
I found same issue when I was trying to debrick my WNR3500Lv2 today.
The router doesn't boot, just the power light glows.
Then I switched the position of rx and tx cable.
And the router boots, PuTTY displays the messages.
Then I successfully uploaded correct firmware to my router.
Everything went fine.
How to switch position of rx and tx cable?
Sorry about my English. I mean, I swapped the position of tx and rx wire. (yellow and orange wire in the picture of step 8). I connected yellow wire to pin 2 instead of pin 5, orange wire to pin 5 instead of pin 2.
hi,
I mad some little project based on WNR3500L OpenWrt.
After that i bought more routers WNR3500L but today i discovered that these new routers are v2.
I tried to flash them with image of my project but since that board ID and Image ID are different it is not working.
What can i do?
Which firmware are you using to flash your WNR3500Lv2??
I used shibby tomato when i flashed my router.
To awnser "The router doesn't boot, just the power light glows."
The guide is wrong, just look at the picture when u connect the cable and dont read the text since JP1 is pin 1 on wnrlv2.
Another ting is that when i tryed to flash my router on my work computer with the beta Putty i culd send the file with Tftpd64 but nothing more happen. When i got home and downloaded the non beta Putty it worked. Can be my work laptop that messed up but just to be sure dont download the beta putty.
I believe that a serial port connection would work, if you have the proper cable to connect to the pinouts on the router.
I am by no means an expert, and I imagine there are many advanced ways that these routers can be reflashed--I recommend the USB-TTL route since most users are likely to have a USB port on their machine and it's a pretty simple method that's very accessible even to "newbies" :)
If it's any reassurance, I've recovered my 3500L back from the "dead" many times. It's just par for the course when you're flashing/re-flashing so many different firmwares that something will happen at some point. With that cable you should have no issues at all.
Glad it worked well for you. It really is the best and easiest way to go! You got a pretty good price, too... last one I bought was over $20 USD.
I'm out of ideas, been trying everything in this thread.. The only thing I can't do which would work is to shortcut those two pins but I've got a newer version apparently so there are no pins!.
I get a connection to the router but I can't CTRL+C in putty. The ping responds two times before going into request timed out.
Tried to use another CMD window with pint -t to slow down the boot process but no result.
What can I do when I've got no pins to shortcut! :)
Wow, quick to respond here! :)
Sorry for not providing with more details.
Yes, I'm using the USB-TTL and I've got output in putty, I get the info about the router and I'm trying desperately to break it with CTRL+C but it ends with the
"Loading: .. 5192 bytes read
Entry at 0x80001000
Closing network.
Starting program at 0x80001000"
and then stuck.
Since I get the short green light and a brief ping contact with the router the shortcut would have worked...
@Mokona512: I don't have much experience with soldering, but could always try it out.
I was going to update the tomato version... I don't know why but for some reason I thought it was the WNR3500L router I had and not the V2.. So while flashing I started to realize that I might be wrong.. :) That's what you get for not taking it slow and check the hardware before flashing away.
Yes I tried the 30/30/30, also been tapping like crazy on C while holding CTRL but I will try more. Someone wrote that pinging the router in another CMD window might slow it down enough to get through with the break.
Appreciate the help anyways, thanks! :) Perhaps what's left is to solder those pins and shortcut it?! Could switching the computer help?
EDIT: Well this is embarrassing, I had the wrong cable on PIN 2, that's why I couldn't break into the bootloader. Well let my noobility be lesson for others to check their cables. :)
I thought that with the wrong cable setup Putty wouldn't show anything.
So, I have the cable and Putty and I can see the router booting up. I get the following (and I'm holding down the CTRL-C while powering up the router):
CFE for WNR3500L version v1.0.0.36
Build Date: Tue Aug 11 15:09:14 CST 2009
Init Arena
Init Devs.
Boot Partition size - 262144 (0x40000)
Found a 8MB ST compatible serial flash
et0: Broadcom BCM47XX 10/100/1000 Mbps Ethernet Controller 5.10.56.28
CPU Type 0x19740: 133 Mhz
Tot mem: 65536 KBytes
Committing NVRAM......
It does not go any further than the committing NVRAM. I'm not getting the CFE prompt so I cannot start the TFTP server.
Any suggestions?
Hi! May be this will be useful to others reading a thread:
It should be not nesessary USB, it may be COM, but directly wiring PC COM port to router will not work. I do not know exactly, but RS232 has diferent polarity or 0-1 levels voltage or something.
Connecting COM to router requires also signal level transformer, usually made on MAX232 chip. Now it is more easy to find a USB-interfaced wire than COM.
In addition, your cable should not nesessary be special USB-TTL wire. In most cases it is useful to check old Cell Phones data cables, if you check their pinouts and find TX, RX, GND pins, and if this cable connected to computer is recognized as a COM-port, those cable will be 99% workable. In my case Siemens C35 cable was excellent, I recovered with it my Seagate 7200.11 after firmware bug known as "CC error".
Hi here,
I've followed the guide and I'm stick in step9.
When I power on the router and I'm on the Putty page, the process not be stopped by Ctrl+C... I'm actually don't understand what is going on, cause everything is well connected, as GND to 6pin TXD to 5pin and 3v3 on 2pin.
Why I can see the cfe running, but I can't stop it!?
CFE for WNR3500Lv2 version: v1.0.9
Build Date: Fri May 6 11:54:17 CST 2011
Init Arena
Init Devs.
Boot partition size = 262144(0x40000)
NFLASH Boot partition size = 524288(0x80000)
et0: Broadcom BCM47XX 10/100/1000 Mbps Ethernet Controller 5.60.136
CPU type 0x19749: 480MHz
Tot mem: 131072 KBytes
Device eth0: hwaddr 84-1B-5E-4E-FD-2C, ipaddr 192.168.1.1, mask 255.255.255.0
gateway not set, nameserver not set
Checking crc...done.
Loader:raw Filesys:raw Dev:flash0.os File: Options:(null)
Loading: .. 3856 bytes read
Entry at 0x80001000
Closing network.
Starting program at 0x80001000
@the duke86: In most cases the reason is "loose connection". Check if there is any.
http://www.ebay.co.uk/itm/USB-TTL-Converter-Arduino-Atmega-Robots-/13088...
would this work to connect the router, i understand it is variable between 3v and 5v will this still work without frying the board if not can someone link me to another working ttl cable that doesnt cos $30 with $50 postage
The TFTP transfer needs to be done in binary mode, this really tripped me - until i stumbled upon a mention of it in this PDF:
http://www.myopenrouter.com/downloads/file/109/WNR3500L_OpenSourceGuide.pdf
Hey guys, i've done the debrick .. You should find wich pin is 3v on the router, following the guide sometimes you could be stuck at process 9, anyway to stop the system you should turn on the router but before to turn on you must to keep touched ctrl+c in telnet..
I find th way, i've stated the router after to hold ctrl+c and it has worked well.
Yes it
works, i bought the same cable, its double function, 3 and 5 volt, but you need to connect only the 3v pin Rx pin and Tx pin.. Follow the guideline with pdf file posted before..
In the later versions JP1 is next to pin 1. It's actually not quite clear what color RX, TX, and GND is (for use with other USB-TTL cables) but that's here http://www.cesareriva.com/netgear-wnr3500l-v2-debrick/
Much thanks for this tutorial, I succesfully unbricked my WNR3500Lv2.
@Hachy -- awesome, glad to hear it helped.
ok, so ive bought the cable and i tried to debrick the router, firstly i get into the cfe menu without pressing ctrl+c and i am able to transfer the .chk file to the router i see a few errors when it is programming but eventually it works again, until i try a reboot, what am i doing wrong here?
Pages