Introduction:
Using serial console setup users can get access to the serial console of their router. Serial console setup finds its most important use in debricking a router. Moreover, developers may use it to extract useful debug information from their routers.
This short tutorial explains how to setup serial console for Netgear R8000.
Identify location of Serial pins on your router:
First open the case of your router. You should be able to find pins for serial communications at the location indicated in Figure1(a).
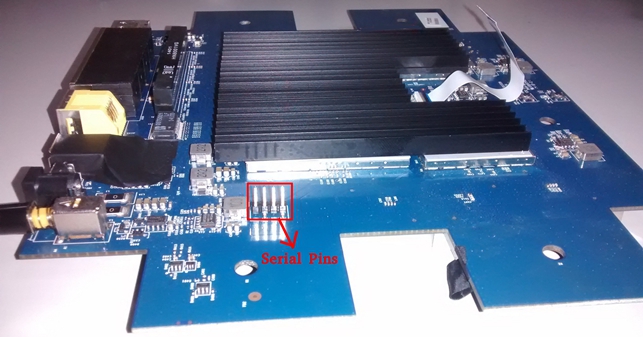
Figure1(a): Serial pin location on your router
Note:-
Some R8000 router may not come with pins for serial communications. In such cases, you will have to attach the pins on your own. Go to the location as indicated in Figure1(a), where you will find a connection with the name J252 as shown in Figure 1(b). Solder the pins here carefully.

Figure1(b): Serial pin location on your router
Identify important pins on router for serial communication:
Important pins on the router for serial communication are identified in Figure 2.
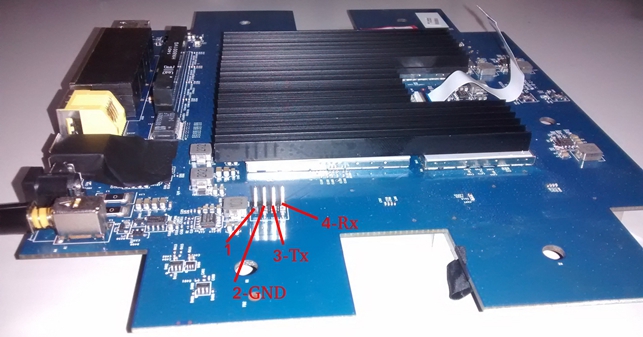
Figure 2: Important pins on the router for serial communication
Identify important pins in USB-TTL cable:
Important pins in the USB-TTL cable are indicated in Figure 3.

Figure 3: Important pins in USB-TTL cable
How to connect USB-TTL cable to the pins on the router for serial communication:
The connection between USB-TTL cable and pins on the router for serial communication is explained in Figure 4.
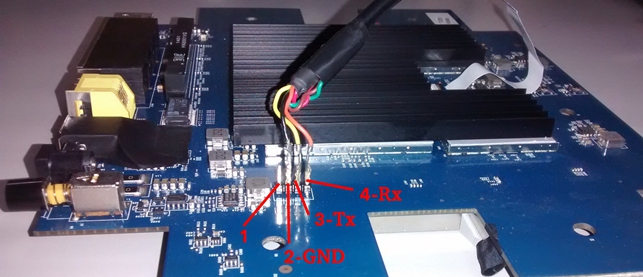
Figure 4: Connection between USB-TTL cable and pins for serial communication
Physical setup of your serial console ends here.
Verification of the setup:
To verify your setup, start serial client on your PC with proper parameters and then power on your router. As soon as you do this, you will be able to see debug information from the router on your screen. If you do not see anything, check that all the connections have been made properly and if in doubt, reattach the cables. Verify that the Serial Client has the proper parameters for the connection.
Question:
Does the USB-TTL cable (FTDI) need to be a:) 1.8v b:) 3.3v or c:) 5.0v.
Just thought I'd ask before I, a:) ordered the cable or b:) burned up the router.
I would say the voltage isnt the crucial part, aslong as you know wich pin sends the V and don't connect it, the important ones are Ground, RX and TX. Wich may vary depending on what cable you are using.
I followed this with an --- ALTHOUGH! I would not recommend this one, but it did work for me. Using windows 10 (PROBLEM with driver tho, had to get a homemade driver) I did get some bluescreens stunning huh? But in the end the router is up and running.
Adafruit 4 Pin Cable (PL2303)
This is a Prolific chipset based cable. Some people have reported issues with the cable causing some issues with data corruption. You experience may vary. You will need to install the Prolific drivers. Those can be downloaded from Adafruit.
Just remember when connected and you have inputs on the serial prompt (putty or minicom or w/e)
1. Restart the router
2. Press ctrl + c untill you see CFE
3. Type tftpd - To start the TFTP server
4. Connect the PC to a lan interface and give it a static ip, preferebly 192.168.1.2 but you can put anything withing 192.168.1.2 - 192.168.1.254.
5. Use any kind of TFTP client and put the "R8000-V1.0.3.4_1.1.2.chk" (Firmware file) to the server
Using windows build in TFTP (YOU CAN ENABLE THIS IN PROGRAMS AND FEATURES) from command prompt
tfpt -i 192.168.1.1 put R8000-V1.0.3.4_1.1.2.chk
Make sure you are in the same folder from i did put mine in the root of C: so all I did was cd C:\ and then did the TFTP put command.
after a while you get a succes message, if not try again. The router might have timedout.
6. Using linux from terminal
tftp 192.168.1.1
> binary
> put R8000-V1.0.3.4_1.1.2.chk
Note that you will need to be in the correct directory when you begin.
7. Enjoy the ride.
Is possible to do the unbrick process on a MAC via terminal?
Hi i enjoy my new wifi route it great
Just tried latest 3rd Jan 2017 kong release
dd-wrt.K3_R8000.chk
Its obviously not bug free!!!
After configuring a wifi password it caused a continous reboot loop :(
So I shall be reflashing it after wiring in a UART serial cable as per above to recover the device. Think I will go back to stock firmware as this isn't very stable !
Ok did this and managed to successfully recover my R8000 router, while adding a very useful serial diagnostic log capability.
There are a few details missing here.
Dismantling the case to fit the USB to Serial UART adaptor.
1. When dismantling the case there is one further screw hidden behind the product sticky label on the underside of the device. Also be careful
disconnecting the ribbon cable for the strip of LED lights and Wifi, WPS buttons since it could easily be damaged with force. As conventional on ribbon cables there is a little plastic tab which flips up allowing the cable to easily be removed.
Serial Connection to PC
1. Very little information was present on the serial settings for the connection. I found the ones which CFE for the R8000 are configure with are;
Baud rate: 115200 8 bits, No parity, 1 stop bit. (or 8-N-1)
And just a FYI, my USB to Serial UART converter was a 3.3v.
2. I used PuTTY on Windows, or minicom on Linux. Under Windows you can find the serial port to use to connect from Device Manager (Ports), COMx.
Commands in CFE
3. Once your connected you should see the bootloader logs.
4. Pressing multiple times CTRL+C to abort the CFE boot loader autoboot and drop you into a console window of CFE boot loader (Broadcom's open source bootloader).
5. You can then type in 'help' to see a list of commands, I used 'nvram reset', or if you want to learn about the command 'help nvram'.
6. Once you reboot (assuming flash is ok but configuration was the issue like in my scenario which was resulting in a Kernel Panic and reboot)
if you can login. Default DD-WRT login credentials are username 'root' and password is 'admin'. Once logged in you can use the command 'erase nvram'.
7. Once I did this I was able to login via RJ45 connection and get back the administration pages and prevent the kernel constantly going into a reboot loop.
I'd seriously recommend building the stack from source-code if you intend to use this release on your device since its not very stable and will require some further debugging. Good luck!
I also bricked my R8000 trying to setup tomato. I managed to connect the R8000 with a USB TLL cable. From top to bottom: Red/Black/Green/White.
I set up Putty on COM 4 (Same as in Device management Prolific: COM4) On the R8000 i connected RJ45 cable (port 1) to laptop. I started up putty but nothing happens when i push and hold ctrl C. When i shut down putty it asks me if i want to close the session.
The only thing i see is a green block in putty! I didn't connect the power cable on the R8000. The botton light stays amber. Please can and will somebody help me to solving this problem?
Many thx in advance, Rebecca
when i try connect via serial and tftp i get the error:
reading:: failed: I/O Error
Bought a router from someone else who said it was working well. turned out brick.
Am i tripping, or does the pictures of the serial connections and the labeled ends from the cable not match?
Hello,
I have the converter "usb-ttl" and made all the connections in the serial port of the router. If I access via ethernet I can ping and respond correctly.
But if I want to transfer the file through the COM2 port I do not understand why the command has an IP address (192.168.1.1)
This is the command that says:
tftp -i 192.168.1.1 put R8000-V1.0.3.4_1.1.2.chk
I clarified that I have the original firmware ... I'm not using the dd.wrt
If you can help me, I would appreciate it.
Christian
Hate to bump an old thread, but I flashed back from Merlin to ofw, and now my R8000 won't load any firmware. It is currently stuck on the 1.0.3.4_1.1.2 with no way up update. I've tried Merlin, netgear, dd-wrt, all loaded through tftp as shown above. After the firmware is sent, the router goes back to "Reading::" and doesnt p
Move forward until it times out and reboots to 1.0.3.4_1.1.2. Any ideas?
To add to all of the good information here .. I just did this process to move my R8000 to DD-WRT and was getting the "not allow to downgrade firmware" error.
I followed emailt31's recommendation closely, with a few tweaks to make it actually work:
#1 - I found no need to open the case to connect to the jumpers on the board. Simply taking the black plastic pieces carefully off the pins on my USB-TTL cable gave me the ability to drop them right on the pins through the case. I didn't open it up at all .. and this took about 5 minutes to accomplish:
#2 - I used minicom on Ubuntu 14.04. It worked well. You just need to use dmesg to identify if your TTL is recognized. Ultimately it ended up being located at /dev/ttyUSB0 for me.
#3 - In order to send the Ctrl-C to the router from minicom, you need to turn Hardware Flow Control to OFF. Then you can send the CTRL-C easily.
#4 - It's not so clear in any of the lists, but you need to create the serial link as shown here .. AND AT THE SAME TIME, an ethernet link from a computer to the router. You'll do the tftp put command from a different terminal (same computer possibly) than the CRE serial connection.
#5 - To get the system to flash my desired firmware, I needed to do the following to avoid the "not allow downgrade" error.
That worked for me in this combination. Good luck, and remember, all caveats apply. You're on your own if you do this .. and there's no warranty to these notes I'm providing. Credit to the posters on the following link for posting the information that made this work for me (#2 above especially was critical information):
https://forum.dd-wrt.com/phpBB2/viewtopic.php?t=315110&postdays=0&postor...
Good luck.
i did a search on google and was brought to this thread. i have the netgear 8500 with a bootloop. ive been trying to follow things that are suggested in this thread but my skill levels are not quite up to you guys here. i bought the usb ttl cable from ebay and im not having any success. its most likely due to the fact that i may be skipping many step as it appears to me that most of you guys in this thread have a clue to whats being said and suggested. is there a step by step for dummies on how to fix this? would appreciate any help
thank you
Thank you all for the good information posted here. I have an R8000 that I"m trying to set up to run dd-wrt. I have managed to get the usb-serial cable connected to the router and PC and can see the debug text flow accross the screen when I reboot the router. I think I have set the parameters correctly, including flow control settings to off. For some reason I cannot get the serial console to display the CFE prompt. Every time I reboot the routher and start hitting Control-C, the debug text just keeps flowing. I have tried Windows 10 with Putty, and Ubuntu 18.04 with minicom. Using both methods, I can see the console debug info on the terminal window, but Control-C does not break the reboot cycle or take me to a CFE> prompt. What am I doing wrong? I'm assuming the cfe prompt looks something like this "CFE>" and is wating for my input, but I never see that.
I fiinally got the Control-C to work and the console came up to the CFE> prompt. Reversing the green and white wires on the Adafruit USB-TTL cable was the thing that finally worked. I assumed that since I was seeing the debug text flowing across the console terminal screen that the RXD and TXD were connected correctly, but somehow the text still made it to my terminal screen while having the two pins reversed. According to the labeled photo of the board above, pin 1 is closest to the back of the board where the power switch and network connections are. So the connections that worked for me are as follows: Red wire not connected and pin 1 not touched. Black wire connected to pin 2 (ground). White wire connected to pin 3. And green wire connected to pin 4. Like one of the other commenters, I was confused about the meaining of RXD and TXD and whether to conntect to RXD of the cable to the TXD of the board or TXD to TXD. The USB-TTL cable I used was Adafruit product number 954 https://www.adafruit.com/product/954 Once the wires were connected to the correct pins, I was able to switch on the router and continueously hit Control-C and after a few seconds got the CFE> prompt. Tomorrow I will try to use the flash command and load a custom firmware with TFTP.
Just wanted to follow up and report that I was able to flash the latest Kong build using the steps from sabain's comment, steps 1-5. I'm very happy with the firmware so far, and following sabain's steps didn't "brick" anything.
This worked perfectly to unbrick my R8000. Thank you!
Hey everyone, I've tried posting this as well at netgear
(I can ping the router when I give it a static IP only)
Hello everyone, I believe I have a bricked router.
Background
-I had DD-WRT on the router, tried to flash back to factory firmware
-I set a static IP, I log into that IP and it redirects to www.routerlogin.net and goes no where...
-I tried accessing the WIFI but my connection just drops
-The power LED is white
Actions
-I tried using the command prompt and also the program suggested on these forums to TFTP the firmware to the router without success.
-I am now trying the USB-->serial connection cable and followed the following thread for pinout etc.
https://www.myopenrouter.com/article/how-set-serial-console-netgear-r8000
-When I have the ground / TX & RX connections setup the router does not seem to go through a boot cycle, the LED lights for the lan ports stays constantly lit, and nothing appears in putty when I open the serial connection and then turn on the router. (Hitting CTRL C constantly)
-If I remove the ground wire the router does seem to boot, the LAN LED's are not lit and with the serial connection though the power LED stays constantly amber and solid, whereas without any serial connection it is white and solid.
Lastly, if I take the ground pin and pug it into the first pin which the diagram says is not the ground / required my USB-->Serial connection lights up. Again hitting Control C in Putty I get what appears to be blocks of dots every time I hit control C.
-Other things I have tried is hitting enter twice as well in Putty
-Switching the TX / RX
-Changing the baud rate from 115200 to 9600
Any ideas?
Thanks a lot I have now unbricked my R8000 and reflashed Advanced Tomato and all is going :o)
BTW anyone having trouble also use this guide.
https://www.myopenrouter.com/article/how-debrick-or-recover-netgear-r700...
The USB-TTL USB-ITC- ISP programmer from eBay works fine.
so how do you initiate a file transfer over serial only. can't seem to get even a ping from the router. i can get cfe via serial but nothing else
i apoligise if i missed the answer to this question. somewhere
Hello, I have a bricked Netgear R8000, which got the wrong firmware.
I can establish the connection with the USB-TTL cable and put the device in tftpd mode, but then I cannot establish a connection via LAN port (ping fails).
If I restart the router and don't interrupt it, I can ping the router.
But In this state I can not upload the firmware.
Does anyone know a solution to this problem?
Kind regards, Daniel
Bumping a really old thread but I used this and other guides to get my R8000 up and running after blocking myself out of my router and using a firmware which breaks the buttons on the router (Kong beta)
The trick is to make sure you have the correct drivers Prolific 3.3.2 I believe, the device manager should say phased out 2012, this means you have the cheap Chinese cable that the driver blocks so it won't work and you get stuck waiting for a window to pop up on Putty.
So, install the old driver 2008 (by default it's 2021...) and as soon as I did that I saw the window and did ctrl c, and then I did NVRAM erase and boom, the router paid £250 for 8 years ago up and running again..
I'll try and see if I can upload a picture of the wires I got, paid like £3.80 for cable on eBay
I bricked my R8000 by loading a FreshTomato config for my old R7000 onto the R8000. I had a lot of issues trying to get the serial port working on Windows 11 to unbrick this. My TTL-USB device is based on the Prolific chipset too and I got the same message regarding it being phased out in 2012. I did manage to use older 2008 drivers but after a reboot it would BSOD every time I tried to use it. I ended up using Ubuntu 22.04 Linux with Minicom which worked fine with the Prolific chipset.
A few extra notes for anyone else stuck here: