

After years of using Linksys WRT54G routers, I decided that it was time to look into a newer setup for my system. I'm not currently having any problems, but my routers are the old V2 & V3 versions. They're no longer being manufactured, and if they went bad - I would have to buy either a new version of the Linksys, or an alternative.
I also use my netowrk quite heavily (you'll see why in a moment) and don't want to risk down time if one of my routers went bad.
So, I bought a NETGEAR KWGR614, mainly due to the open source feature set that it offers. First of all, let me go through my current setup, so you can see why I need to be sure that I have a good configurable router.
- There are 4 PC computers spread out throughout the home, plus an additional laptop that I bring back and forth from work.
- 1 server on the system.
- 4 TiVo's that are connected to the network in various configurations
- 3 SlingBoxes connected to the system
- 1 EVA 8000 connected to the system
- 1 Axim V51 connecting wirelessly
- 1 Sansa Connect, connecting wirelessly
- 2 Linksys WRT54G router, running in "Bridge" mode connecting wirelessly to the main router
- 1 SlingLink Turbo 4 port
I have static dedicated addresses to several computers, the TiVos, and the SlingBoxes. I do this as it makes the system more reliable and easier to troubleshoot.
So, you can see my trepidation and concerns about routers going bad, or having to install a new one. Today, I decided to roll up my sleeves, install the KWGR614, and get the basic setup completed.
First, I backed up the configuration of my Linksys, just in case something went awry. I usually back it up anytime I make a change, but wanted to be sure that I had a fresh backup.
Then, I went into the Linksys setup pages and saved the actual HTML file of any page that had something other than the factory default settings. I did this mainly because I wanted to assign the same static addresses and port forwarding that I currently use onto my new router. This would make it so I would not have to remember or write down my settings. It also gave me the ability to copy and paste the MAC addresses and names from the old router into the new one.
My setup uses the main router address of 192.168.0.1. The KWGR614 comes with 192.168.1.1 as its main setting, and then uses 192.168.1.xxx for all the devices connected to it. Instead of changing all the devices and my familiar settings, I decided to have the router use the "0" address.
This is really not a big deal. You can change the main address of your router to quite a few different ones. Just remember that you are not stuck with the router address setup that is pre-loaded from the factory, for future reference.
I unplugged everything from my current router and plugged in the new KWGR614, and hooked up all the connections.
I went to one of the machines and there was no connection, but this was easily resolved. The machines I use are Windows PC's and are set up to obtain their adressses automatically. All I had to do was to go into my Network Connection Status and on the Support tab, click on "Repair."
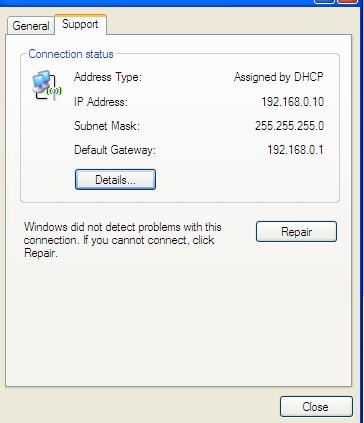
You can also go to Start > Run and type "CMD" into the box. A new window will open up and you can type in "Ipconfig /renew" and it will do the same thing.
After you do this, the computer will reset everything, and you should be connected to your new router.
Now that I was connected, I needed to set up the router to work on my system. I typed in 192.168.1.1 in Firefox and immediately was shown the "sign in" password screen. The name and password that NETGEAR uses is shown on the bottom of the router. So, I entered the info and got into the initial setup screen.
When you setup the router for the first time you are given a choice of using the setup wizard or configuring it manually. I chose the manual setup.
In the Manual Setup you will be shown the basic settings screen first. The first thing I wanted to do was to change the router from 192.168.1.1 to 192.168.0.1. To do this, click on the LAN IP Setup tab and change the 1 to a 0.

When done, just click on "Apply". The router will reboot and guess what? You will not be able to connect again. That's because your computer is still trying to use the "1" setup. All I had to do was use the "Repair" function I described earlier, and get assigned a new address again.
I once again logged into the router and started setting up all my devices. The first thing I wanted to do was to give everything that had a static or assigned address the same adress in the new modem.
I clicked on the LAN IP Setup and then the "Add" tab. There, I could enter the MAC addresses I had used on my old router. This is where saving the web pages of my old router came in handy. I opened up the page that contained all of the old address settings (in a new window) and started copying and pasting the setup.
Once I had it done, it looked like this:
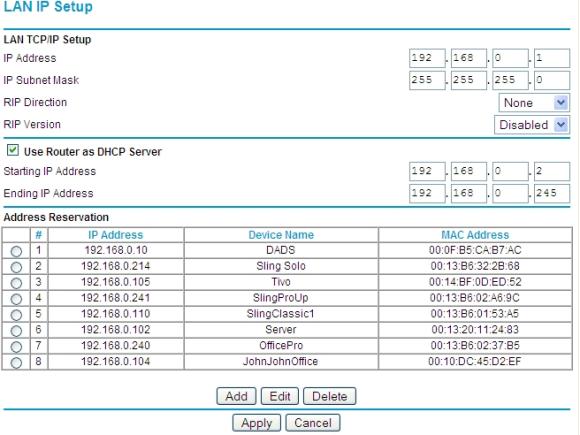
Then, all I had to do was click on "Apply," and everything was good to go. All the devices were now assigned the number they normally used.
The next thing I needed to do was to set up the port forwarding. I assign specific ports to specific devices, so I am always sure that port is open for that device.
I can tell you, this is something I always do for my SlingBoxes. I never have problems with them when I do this - I don't rely on the uPNP that the SlingPlayer uses.
To open up the ports, I clicked on the "Port Forwarding / PortTriggering" tab and again opened up the HTML file I saved from the port forwading page on my Linksys. I copied and pasted my original settings in, applied each one, and was finished.
It now looked something like this:

Now that I have the addresses and ports set up, I needed to setup the wireless side of the router.
I clicked on the top "Wireless Settings" tab and entered the name, channel and WEP password I had used on my old router. This way, any wireless devices I have did not need to be changed.

Once these three things were done, the basics were setup and everything that was working before should work again. I applied all my settings and then backed up my basic configuration, so I would not lose it once I started playing around.
The backup is done simply by clicking on the backup settings tab on the left side, then clicking on "backup," and selecting a place to save the file.

Now, the basic settings were complete. I double checked all of the PC's and devices to make sure that they all worked - and they did. I tried the SlingBoxes and Tivos also, which worked like a charm. Checked the server and it was a-ok! Finally, I checked my laptop to see if it would connect wirelessly, and it sure did!
Now that I have the basics going, I can check my speeds on both the LAN and WAN and see if there is any difference. I can also play with some of the service blocking the new router provides.
Recent comments