
Updated 01/12/2010 by BrandonC.
Introduction
A wireless client bridge is needed to connect two LAN segments with a wireless link. The two LAN segments will be in the same subnet. In this article, we will show the steps to configure the NETGEAR WGR614L with DD-WRT firmware (downloadable by clicking here) as a client bridge.
Please note that when a router is working as a wireless client bridge, we cannot connect wireless clients to it .
Primary Router Setup
The primary router can be any brand of router. In fact, it can even be a simple AP. The DD-WRT firmware with wireless bridge mode needs only to be installed on the secondary router (NETGEAR WGR614L) which will be configured as a client bridge.
I have given my primary router (or primary AP) an IP address of 192.168.1.1. You can assign any IP you wish, provided that both primary and secondary routers are in the same subnet. Usually, DHCP should be enabled on the primary router so that it can assign IP addresses by DHCP. Without DHCP enabled, your bridged peripherals may not be able to get onto the network.
If you want, you can disable DHCP on the primary router; however, in that case, you will need to manually provide an IP address to each of the peripherals connected with the secondary router.
Configuring Secondary Router (DD-WRT):
Step 1: Plug your Secondary router into your computer and open a browser on your PC and connect to the DD-WRT router - usually, its default address is http://192.168.1.1
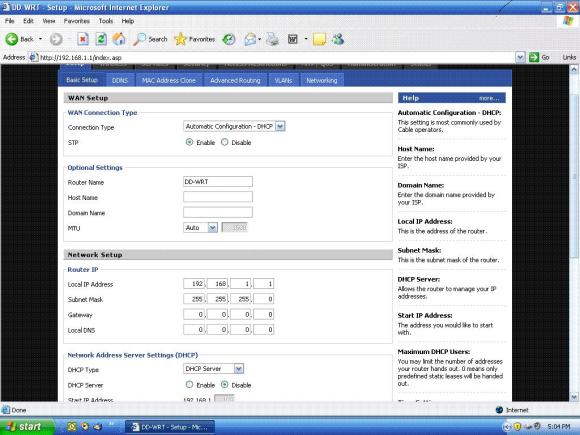
Step 2: Click Setup / Basic Setup. Scroll down to Network setup and choose a Local IP Address that is not in the DHCP range of your main router. In my case I have my main router dishing out addresses starting at 192.168.1.100. So I put the secondary router at 192.168.1.4

Disregard everything else and click on Save and Apply Settings. This will reboot your router and if you have your computer set to obtain an automatic address it will then find the new address and you can move to the next step.
Step 3: Click Wireless/Basic Settings. For Wireless Mode select "Client Bridge." Then enter your Wireless Network Name (SSID ) of your main router that you will connect to. (For me it's "DD-WRT")
I also set my Network Mode to "G" since there would never be a time I would need a "B" connect. You can leave yours at "Mixed" and it will still work fine.
You can see this setup in the picture below.
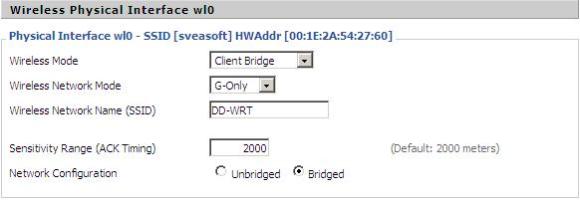
Now just click on Save/Apply Settings.
Step 4: Click Wireless/Wireless Security. For Security Mode, select the appropriate choice that matches your primary router - either none, WEP, WPA or WPA2. In this example, our primary router uses none. As such, I have kept Security Mode disabled as shown below :
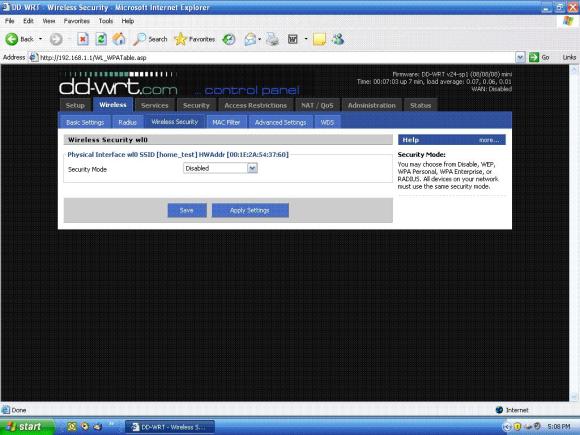
If you use security for wireless just enter that information and again Save/Apply Settings.
Once done I recommend you reboot your router and then test it.
Testing your Bridge
You've now completed the bridge, congratulations! You can test it by receiving an IP address from your primary router if DHCP is enabled there.
Your PC should receive an IP address assigned by your primary router. You can test this by opening a browser and connecting to an Internet web site or by pinging the primary router.
If you have not enabled DHCP in the primary router, you can manually assign an IP address to your PC, keeping the subnet same and then ping the primary router.
Your bridged devices should get an IP either through DHCP from primary router or through manual configuration. Hopefully, your PC has connected to the Internet or you are able to ping the primary router. Your bridge is working! You can now disconnect the temporary PC and connect the DD-WRT router to your intended peripheral(s), such as your printer or Xbox.
What To Do If Testing Fails
If your PC is not receiving an IP address from your primary router and can't connect to the Internet, or if you are not able to ping the primary router, the bridge is not working correctly. You will need to recheck all the steps from the beginning. Please feel free to post comments for me in this article or on the MyOpenRouter forums if you have questions regarding this setup!
Recent comments