
Mac users are often no strangers to playing around with Terminal windows and custom software. Although Mac OS X isn't open source, it's built upon BSD and Unix, and thus can be used to recover your WNR3500L in case something goes wrong... with the aid of the Developer tools and some third party open source packages.
Frankly, even for a Mac nerd like myself, it took quite a while of digging around on multiple articles, sites, and forums to find a combined solution for recovering a bricked WNR3500L - but I have managed to complete it successfully. Apple fans, rejoice that you can save yourself hours of Internet searching with my easy-to-follow tutorial!
Note that several of the steps in this tutorial are identical to those contained within the Windows tutorial. I am repeating them here as many users may not be interested in reading the Windows-specific article.
Materials Needed

- 1x Bricked WNR3500L
- OS X Installation CD's or DVD
- Ethernet cable
- Mac Desktop or Laptop
- Teeny tiny screwdriver or similar implement
- Electrical tape (Optional, but recommended)
- USB-TTL Cable from FTDI. You can purchase one of these from Mouser Electronics. Ensure that you have model TTL-232R-3V3 specifically, or you can fry your router! See photo above.
- Torx T6 or T7 screwdriver
- Thin flathead screwdriver (Optional, but recommended)
- NETGEAR Original Firmware for the WNR3500L (Download from here and put into your C: drive).
- Patience. Some of these steps may take multiple attempts.
Step 1: Crack Open the Router

Well, don't literally crack it, unless you want a broken router! It's pretty easy to open, but be careful. Use the Torx screwdriver to remove the two screws on the bottom of the unit first.
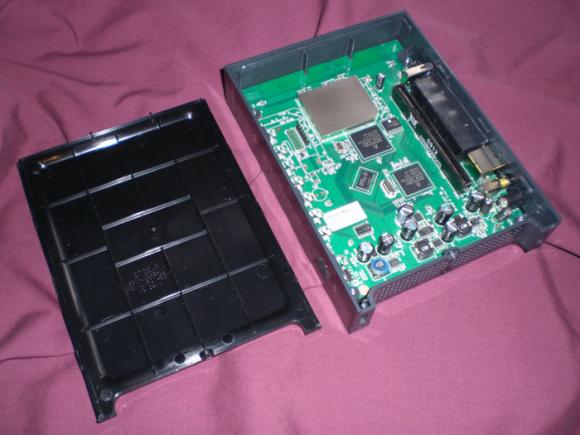
Now, you will have to unsnap the case from the router. In the photo, look closely at the router's casing. You may be able to see the tabs on the left and right side. The panel you need to remove is the "top" panel - look at the back of the router and turn it so the text is right side up. The top panel, when the router is situated this way, is the one you should need to remove. Gently put your screwdriver (preferably flathead) in the seam and disconnect these tabs. Once you are able to slide the case off, put the router aside for now.
Note: The first time removing it, I needed the screwdriver to pry it loose, but on subsequent tries I discovered that the case "slides" and snaps into place. Try various methods to find what works best for you. You may not need an implement to unsnap the tabs at all, if you're lucky!
Step 2: Download the Cable Drivers and Install
Mac OS X has its own set of drivers for the USB-TTL cable, which you will need to download from here.

Once you unzip the file, ensure that you install the correct package for your version of Mac OS X, or your machine might implode, creating a supermassive black hole and rendering your feeble attempt at debricking your WNR3500L impossible.
Seriously, it might not work if you install the wrong one. When you're finished, a reboot is recommended.
Step 3: Modify the USB-TTL Cable for Use with WNR3500L
The bad news: you can't use the USB-TTL cable as-is.
The good news: Modifying it is super simple, no soldering needed.
It looks tempting just to plug the connector of that fancy serial cable you have there, doesn't it? The pin-out on the board looks like an exact fit. However, only three of the leads from the USB-TTL cable are needed, and simply plugging the whole thing in just doesn't work at all.

Take a look at the photo above. See how each of the leads is covered by a small plastic tab? Bust out your tiny screwdriver or whatever it is that you have that's tiny, and pry off the tabs on the black, yellow, and orange leads only. If you choose to remove all six, you will need to wrap up the unused leads in electrical tape to avoid shorting anything out. I just left the unused leads inside the plastic harness as shown above. Once you pry the tabs off, the leads that you will use slip out easily.
[[page]]
Step 4: Install X11 and Developer Tools (If Necessary)
If you don't already have X11 (the Darwin windowing system for OS X) and Apple's Developer Tools installed, you'll need to do so before proceeding. Simply insert your Mac OS X installation disc.
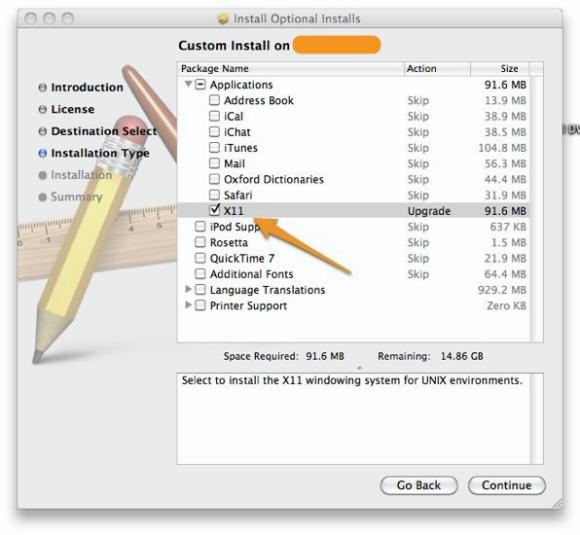
If you see the "Upgrade" like I have shown above, you shouldn't need to reinstall, as there's no doubt the installation disc has a much older version present on it. If not, go ahead and install X11.
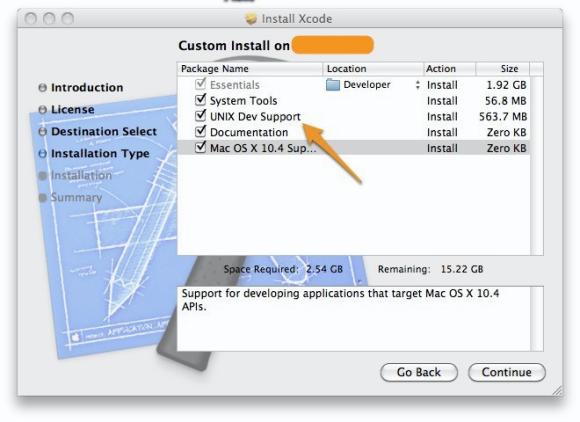
As I mentioned previously, you'll need to have Xcode and the Developer Tools installed as well. Ensure that the "Unix Dev Support" files are installed as shown above. Again, a reboot after these steps is recommended.
Step 6: Download and Install MacPorts
MacPorts is a free, open source community initiative to make it easy to download, compile, and install command-line or X11 apps on Mac OS X. Click here for installation instructions, and ensure that you download the proper version for your system.

A reboot after install is recommended.
Step 7: Download and Install Minicom
Minicom is the serial terminal program we will be using to connect to the flash chip of the WNR3500L. It performs basically the same function as the Windows-based PuTTY, but is more "Terminal-y."

To install Minicom, open a Terminal window and type the following command: sudo port install minicom
You should see a window similar to what you see above when it is complete. Remember, MacPorts must be installed, along with the dev tools, for this to work.
Step 8: Find Out What Port Your USB-TTL Cable Uses
Now we're getting somewhere! Before Minicom can do anything, it needs to know where your Mac thinks your USB-TTL cable is; since it's a virtual serial port, it won't pop up on your Desktop or anything. Go ahead and plug in the cable into your Mac.
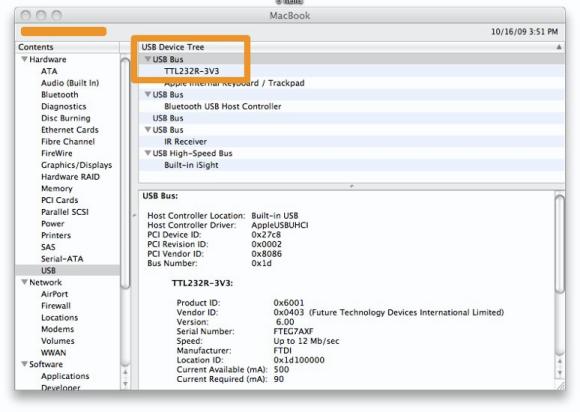
Just for kicks, click on the Apple Menu (the cute little fruit in the upper left hand portion of the menu bar) then About this Mac, then More Info. You'll pull up the System Profiler. Click on the USB section as shown in the photo to ensure your driver installed correctly and that OS X recognizes the cable. You don't have to do this, but it made me feel better.
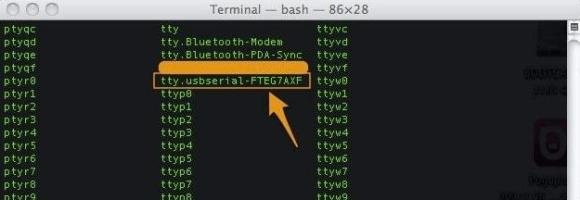
Now for some Linux trickery... open a Terminal window and type this: ls /dev tty*
Look for the section shown above. Your cable should show up as "tty.usbserial-XXXXXXXX" or "cu.usbserial-XXXXXXXX" or both, where the X's represent the cable's serial number (at least in my case.) For purposes of this tutorial, I used the "cu.usbserial-XXXXXXXX" location successfully, but I think either will work with no issues. I have not tested the other, so if anyone is willing to do so and post their results, that would be fantastic! Write down this location and move on to the next step.
Step 9: Configure Minicom
The Minicom serial terminal needs to be configured to use your USB-TTL cable to communicate with the router. Open a Terminal window and execute this command: sudo minicom -s
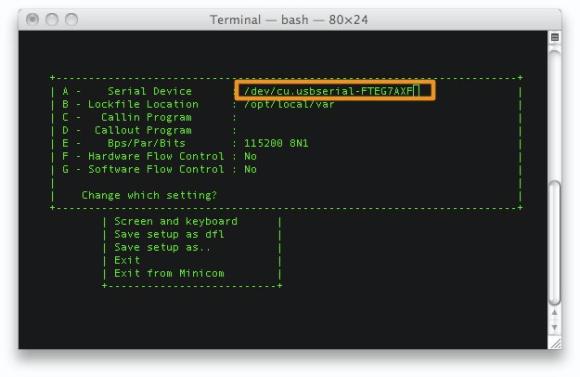
You will be brought to a configuration screen within which you can set several options. Set them as shown above:
A - Serial Device: /dev/cu.usbserial-XXXXXXXX
E - 115200 8N1
F & G - No
[[page]]
Step 10: Plug in Ethernet from Router to Mac
Note: Do NOT connect the power to the router just yet.

Connect the Ethernet cable you have in your possession to an orange port on the WNR3500L to the Ethernet port on your Mac. Note that it must be an orange port, NOT the yellow port... it won't work otherwise. At least, it didn't for me.
Step 11: Connect the USB-TTL Cable to the WNR3500L
Note: Make sure the router is still powered off and unplugged from power when you do this. Don't touch anything metal either, don't want to take any risks of shock or shorting anything out, which is always a potential concern when tinkering with open electronics.
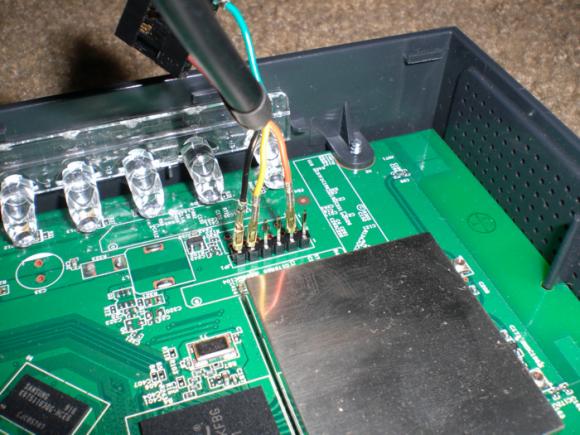
This part is particularly important, as if you don't connect these cables properly it will be very frustrating for you! Take a close look at the photo above. On the pinout on the board, you will see six pins. Next to one pin it will read "JP1." That is actually Pin 6. Pin 1 is labeled with a "1" next to it. Connect the cables as follows and as shown in the photo:
Black => Pin 6 (next to JP1)
Yellow => Pin 5
Orange => Pin 2
Note: In this photo, the black and yellow leads are seated properly. I wanted to show you what an improper cable seating looked like; the orange cable is NOT seated properly. Make sure all the cables are firmly seated to the pins and that they are not touching each other.
Step 12: Launch Minicom, Boot Into CFE, and Start the TFTP Server
Showtime! You're going to be interfacing directly with the board now. Pull up a Terminal window with the router connected and still powered off, and launch Minicom with the following command: sudo minicom
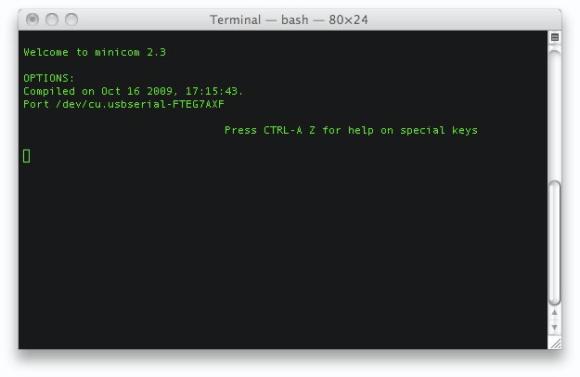
When Minicom is running, you'll see a blank screen like the one above. It's supposed to be blank at this point, don't worry! Note that it has detected the USB-TTL cable and is using it as the communication port.

You will need to power on the router and IMMEDIATELY start pressing Ctrl-C to boot into the CFE interface. If you need to try this several times before you succeed, that is normal. If successful, you will see the screen above with a blank "CFE>" prompt. Also shown in the photo is how to start the TFTP server, which is how you will send the new firmware to the flash chip. Simply type tftpd in the prompt and press enter. Move this Terminal window to the side and open another one.
Step 13: Send the Firmware to the Router
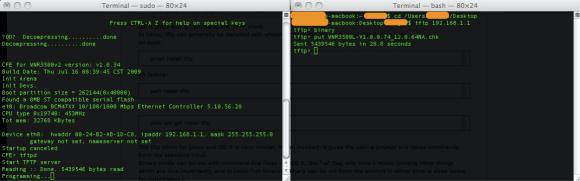
In this new window, change directory to where the firmware is located. If it is on the Desktop, for example, type cd /Users/username/Desktop
Then, type tftp 192.168.1.1
Note that if you do not type the IP address of the router, this next step will not work.
Now, execute put firmwarename.chk
This will begin the flashing process. Watch the other Terminal window containing Minicom. If you have successfully sent the firmware, the "Reading::" prompt will change to "Programming::" Congratulations!
Step 14: Reboot the Router and Reset Settings, If Necessary

I would wait a good, solid 10 minutes or so for flashing to complete. It shouldn't take that long, but just to be safe, it's worth the wait. When my flash was complete, I was presented with the screen above, and simply closed both Terminal windows. I was then able to access the router via 192.168.1.1.
However, with the original NETGEAR firmware, I could not get into the GUI with the default username and password (admin and password, respectively.) I had to use the reset button on the back to restore factory defaults, and was then able to access the router's settings. Also, if that default password does not work, make sure to consult your manual or the latest firmware update notes for the correct password.
Step 11: Rejoice and Relax... or troubleshoot
Hopefully, not the latter, but unfortunately things don't always go as planned. If you're struggling with this procedure or have an unsolvable problem with your WNR3500L, please let us know.
You can post your questions on the public forums or as a comment below!
You are correct :) I have modified the article to reflect the correct terminology. It is indeed based off of Unix/BSD, not Linux.
Has something changed on the macports.org server? minicom fails installation because of lzrsz which it can't find and I can't find on their servers. Going backwards from there I tried to install fetch but that failed of libfetch which failed in much the same way as minicom (file not found) although I found that on their servers. Any ideas? I've completed everything up to the minicom install.
has something changed on macports.org servers?
I'm complete on your guide upto installing minicom. minicom fails installation because it can't find lrzsz package. I can't find it on their server either. Going backwards from there I tried to install fetch (which I do see on their server) but it failed because of libfetch dependency. libfetch installaion fails because it can't be found on their server (however, I see it on their server). What to do?
@HolyGroup - I wish I could be of more assistance here, but it must be that something is up with MacPorts. You could try re-downloading and re-installing the MacPorts software and doing a reboot, just to double check. I don't know if would make any difference (and it probably wouldn't) but you could also try repairing permissions and a reboot.
Beyond that, it might be something you could post on the MacPorts forums.
I know there are other ways to TFTP transfer on Mac, but I had basically zero luck and hours of frustration when trying other solutions... this was the only one that worked.
Looks like a great howto... Unfortunately the new 3500L that I got last week doesn't have the pins on the board to plug into. (Damn you NETGEAR!) It just has solder in the holes that are supposed to have pins.
So it looks like I'm gonna have to learn to solder. :(
I wouldn't teach yourself to solder on your 3500l. :) Take some unneeded electronics apart, practice desoldering (good practice anyway), then solder components back on.
Alternatively, sites like makershed sell practice kits (simple circuits that light up LEDs, etc).
It appears as tftp sends it in ascii, so you have to run
tftp 192.168.1.1
mode binary
put firmware.chk
Thanks Peter,
first off excellent work instruction on the debrick procedure. Secondly, wanted to add a few points that others may find helpful.
My situation was as follows: tried to remove DD-WRT mini (v24 K2.6 svn14289) by telneting into the router and using the "erase linux" command as suggested in
http://www.myopenrouter.com/article/16099/How-To-Reflash-Factory-Firmwar...
Then tried to put native Netgear firmware using TFTP but forgot to use binary transfer mode. Resulted in bricked up router with flashing green power LED.
Followed your procedure and initially kept geeting "Transfer Timeout" messages is both the minicom/CFE server terminal window as well as the tftp terminal window. Finally succeeded with the following additional steps:
1. Turned off bluetooth on my mac.
2. Set IP to Manual and entered IP of 192.168.1.10
3. Set Router IP to 192.168.1.1 (based on CFE info in minicom, and router IP was originally set as such)
4. Set Subnet Mask to 255.255.255.0
5. After tftp'ing into router with "tftp 192.168.1.1" engaged binary transfer mode with "binary" command.
6. Then successfully was able to transfer original Netgear firmware to the router using "put xxx.chk"
I cannot stress the importance of using binary transfer mode with tftp. Had I done that originally, I would have saved myself a world of hurt.
One comment I'd make is that not everyone has the same USB-TTL cable, so talking in terms of wire colors is meaningless. You might want to add this somewhere:
PIN2=TXD
PIN5=RXD
PIN6=GND
Thanks guys!
Couldn't get the WNR3500Lv2-V1.0.0.10.chk to install on the router, but the dd-wrt.v24-17084_NEWD-2_K2.6_mini-WNR3500L.chk worked. I tried with both "binary" and "mode binary" with no result :(
Would love to be-able to have the Netgear firmware on my router again, so if someone might know what the problem is I would appreciate an answer :)
I found my problem with the WNR3500Lv2-V1.0.0.10.chk .. Tought I had the WNR3500Lv2 because DD-WRT said so, but after stumbling over some post on this forum I found out that i actually had WNR3500Lv1 .
Did everything again, but this time with a fw for v1 and it seems to work now :)
Thanks again guys!