So you've gone and done it... you've bricked your WNR3500L. Nothing sinks the spirits like constantly flashing lights and endless reboot loops. However, don't lose hope or get frustrated - there's a solution to your woes, and it's called a serial console.
Before you think that this is too complicated for you, read on. It's actually quite simple, but there are several steps involved that require completion exactly as stated. Remember, you perform these steps at your own risk, but rest assured that I have followed these exact steps to great success and that you should be able to duplicate them. The instructions that follow are for use on Windows systems.
Materials Needed

- 1x Bricked WNR3500L
- Ethernet cable
- Windows PC/Laptop
- Installed TFTP client (Windows XP, 2000, and 7 have this built in. Otherwise, see step 10 for installation instructions/links)
- Teeny tiny screwdriver or similar implement
- Electrical tape (Optional, but recommended)
- USB-TTL Cable from FTDI. You can purchase one of these from Mouser Electronics. Ensure that you have model TTL-232R-3V3 specifically, or you can fry your router! See photo above.
- Torx T6 or T7 screwdriver
- Thin flathead screwdriver (Optional, but recommended)
- NETGEAR Original Firmware for the WNR3500L (Download from here and put into your C: drive).
- Patience. Some of these steps may take multiple attempts.
Step 1: Crack Open the Router

Well, don't literally crack it, unless you want a broken router! It's pretty easy to open, but be careful. Use the Torx screwdriver to remove the two screws on the bottom of the unit first.
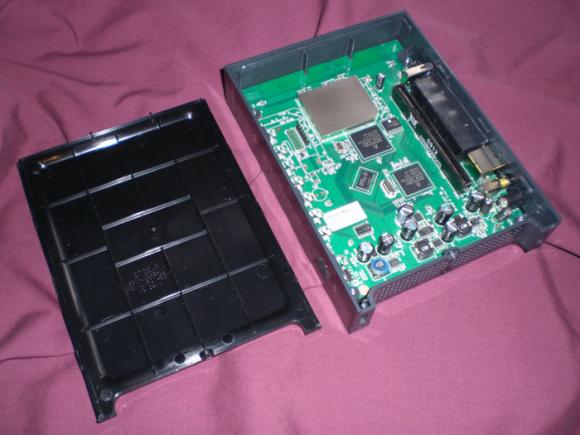
Now, you will have to unsnap the case from the router. In the photo, look closely at the router's casing. You may be able to see the tabs on the left and right side. The panel you need to remove is the "top" panel - look at the back of the router and turn it so the text is right side up. The top panel, when the router is situated this way, is the one you should need to remove. Gently put your screwdriver (preferably flathead) in the seam and disconnect these tabs. Once you are able to slide the case off, put the router aside for now.
Note: The first time removing it, I needed the screwdriver to pry it loose, but on subsequent tries I discovered that the case "slides" and snaps into place. Try various methods to find what works best for you. You may not need an implement to unsnap the tabs at all, if you're lucky!
Step 2: Download PuTTY Program and Install
PuTTY is the nifty, free little program that you will use to program the router, also known as a serial console. Download it from here, and install it using the self-installing executable.
Step 3: Download Cable Drivers and Install
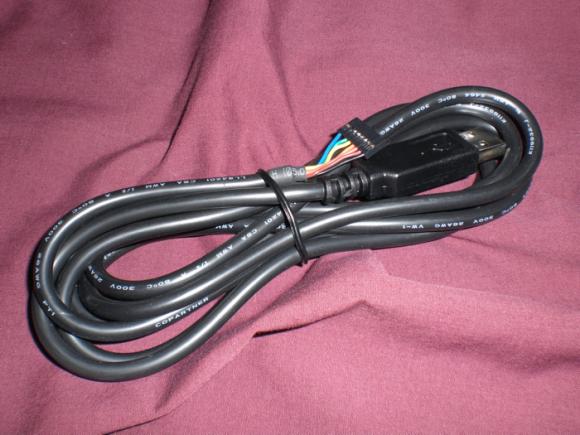
Now, you'll need to download the drivers for your USB-TTL cable. In a nutshell, this cable "converts" the USB interface of your PC to a serial output that the board of the WNR3500L can understand, so you can communicate directly with the board (i.e., not over your network.)
Download the proper driver for Windows from here and install it. A reboot is not required, but recommended.
Step 4: Give your PC a Static IP Address
This step is to ensure that you will be able to communicate with 192.168.1.1, the default address of the bricked router.
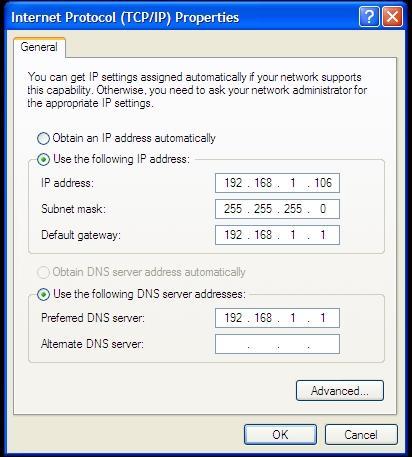
Head to Control Panel => Your Internet Connection => TCP/IP => Properties and change your IP address as shown above. Make sure it does not end in .1, .x1, or .xx1.
Step 5: Plug in Ethernet from Router to PC
Note: Do NOT connect the power to the router just yet.

Connect the Ethernet cable you have in your possession to an orange port on the WNR3500L to the Ethernet port on your PC. Note that it must be an orange port, NOT the yellow port... it won't work otherwise. At least, it didn't for me.
[[page]]
Step 6: Modify the USB-TTL Cable for Use with WNR3500L
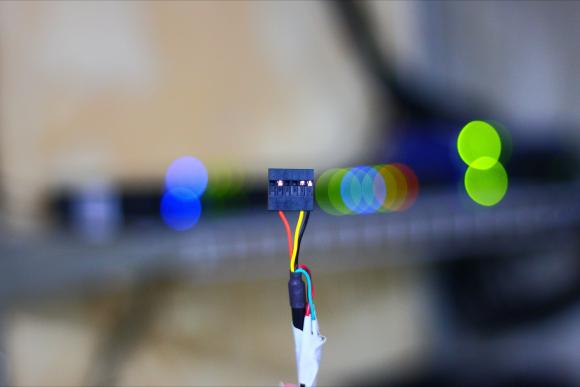
Take a look at the photo above. See how each of the leads is covered by a small plastic tab? Bust out your tiny screwdriver or whatever it is that you have that's tiny, and pry off the tabs on the black, yellow, and orange leads only. If you choose to remove all six, you will need to wrap up the unused leads in electrical tape to avoid shorting anything out. I just left the unused leads inside the plastic harness as shown above. Once you pry the tabs off, the leads that you will use slip out easily. Now, you can plug the cable in.
Step 7: Find Out What COM Port Your Cable is Using
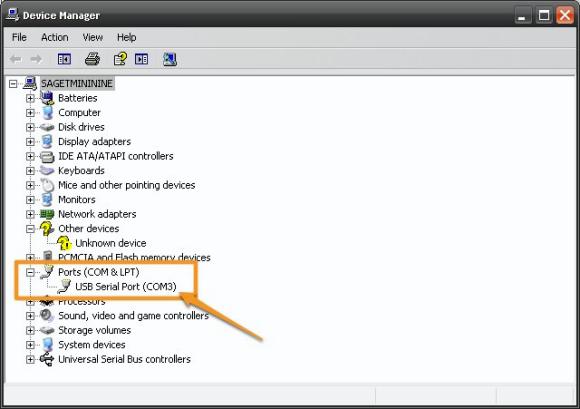
You installed the cable driver in step 3, right? If so, head on over to Control Panel => System => Hardware => Device Manager, and click on the "Ports" item as shown in the photo above. Note the "USB Serial Port" item with a designation of "COM3." You'll use this information in the next steps. If you don't see that, plug in the cable and the Device Manager should refresh.
Step 8: Connect the USB-TTL Cable to the WNR3500L
Note: Make sure the router is still powered off and unplugged from power when you do this. Don't touch anything metal either, don't want to take any risks of shock or shorting anything out, which is always a potential concern when tinkering with open electronics.

This part is particularly important, as if you don't connect these cables properly it will be very frustrating for you! Take a close look at the photo above. On the pinout on the board, you will see six pins. Next to one pin it will read "JP1." That is actually Pin 6. Pin 1 is labeled with a "1" next to it. Connect the cables as follows and as shown in the photo:
Black => Pin 6 (next to JP1)
Yellow => Pin 5
Orange => Pin 2
Note: In this photo, the black and yellow leads are seated properly. I wanted to show you what an improper cable seating looked like; the orange cable is NOT seated properly. Make sure all the cables are firmly seated to the pins and that they are not touching each other.
Step 9: Configure and Launch PuTTY
Hanging in there? Do you feel like a geek yet? It should feel good :)
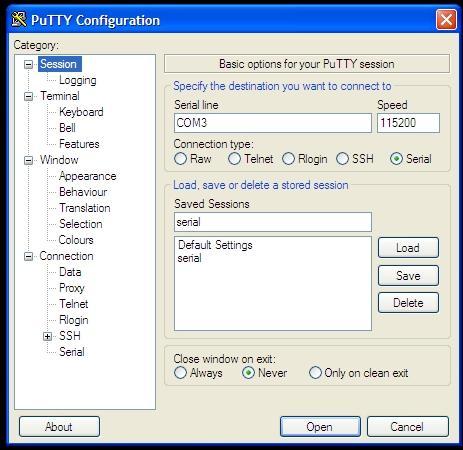
Fire up PuTTY and you'll see the screen above. Select the exact options as shown above; click on the Serial radio button, the port to COM3 (or whatever port was revealed in Step 7) and the speed to 115200.
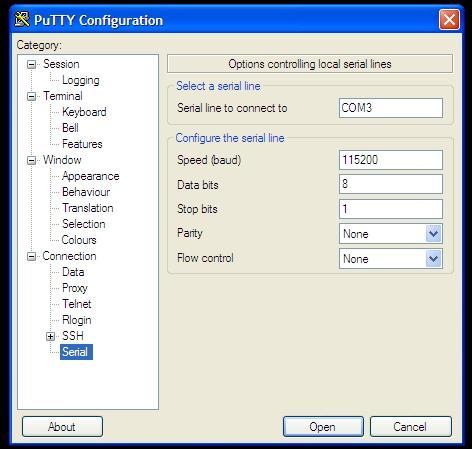
Then, click on the very last item in the menu and choose the options above. They must be exact: serial line of COM3, speed of 115200, Data bits of 8, Stop bits of 1, and "None" for both parity and flow control. Once you are confident these settings are correct, click "Open," and you will see a blank window with a green cursor. Nothing is supposed to be happening in there yet, so don't fret.
Step 9: Power on the WNR3500L and Press Ctrl-C
Now, you can finally connect power to the router. Press in the power button and immediately press Ctrl-C on your PC, with the PuTTY window active. This will bring you to what is called the CFE console; essentially, you're interacting directly with the board. If this does not happen, double and triple check all of the previous steps.

Then, type in "tftpd" (without quotes) to bring up what is called the TFTP interface. This will ready the router for programming. If this step performed properly, you'll be left with the screen above. Almost there...
Step 10: "Put" The Firmware Into Your WNR3500L In The DOS Prompt
Note: If you are on Windows 2000, XP, or 7, you have a TFTP client built in. However, if you're on Win95, 98, Me, NT, or Vista - you do not.
Instructions for installing TFTP on Windows Vista can be found here.
Here is one open source TFTP client for Windows that you can try.
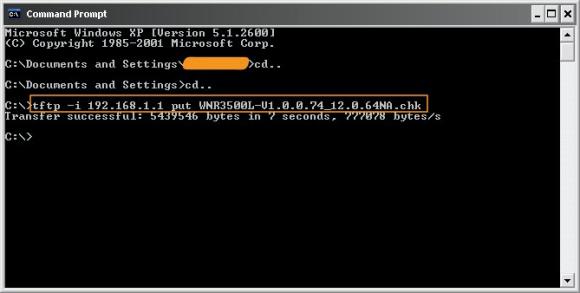
Assuming that you have TFTP installed in some form, zoom on over to your DOS prompt. You copied the original NETGEAR fimware to your C: drive, correct? Good. Type "cd.." without quotes as shown above to get to your root directory, then type this command:
tftp -i 192.168.1.1 put FIRMWARE_FILE.chk
When you do this, the TFTP command will send the firmware file you indicated to the router, and you will get a confirmation as shown above. If this doesn't work, make sure your router is connected to your PC properly, you have a static IP that doesn't end in 1, and that you can ping the router.

If this command is successful, your PuTTY console will start to get some action, and it will re-program the router. Allow this process to finish, it will take several minutes, and wait until it is COMPLETELY finished or you will get a bad flash. And nobody wants a bad flash! You'll get a lot more text than is displayed above, but when it's done, you can try accessing your router's GUI via http://192.168.1.1. You will need to enter the "standard" username and password, consult your user manual for this information. (At the time of this writing, "admin" and "password" were used.)
Step 11: Rejoice and Relax... or troubleshoot
Hopefully, not the latter, but unfortunately things don't always go as planned. If you're struggling with this procedure, have an unsolvable problem with your WNR3500L, or are on another OS let us know. We're continuing to work on recovery guides for Linux and Mac OS X, so stay tuned!
You can post your questions on the public forums or as a comment below!

It would be nice if you update this article with a link where "tftpd" can be downloaded.
Thx
Can you tell us where the best place to download is?
Am I missing a link somewhere? I have included links to the cable purchase, original firmware, PuTTY download, and other WNR3500L articles. Not sure what else you might need :)
*Edit* The OP's post was edited to include a request for tftpd.
Most versions of Windows have tftp built in, from what I understand.
If you do not have it, here's a link to an open source TFTP server for Windows. I haven't tested it, though, so I'm hesitant to include it in my article as a "de facto" solution.
http://tftpd32.jounin.net/
tftpd32 works fantastic - I've used it for tftp-based firmware updates in the past.
A tftp client is included with Windoze 2000, XP, and Win7. It is NOT included with Win95, 98, ME, or NT. For Vista, tftp is in the install CAB, but not installed by default. Instructions at:
http://www.simplehelp.net/2008/09/10/how-to-install-a-tftp-client-in-windows-vista/
One problem with many tftp clients is the inability to deal with a login and password. If that's an issue (not in this case) use the Cisco-Linksys tftp client:
http://downloads.linksysbycisco.com/downloads/Tftp,0.exe
Thanks Jeff for your help - especially for the link on installing TFTP in Vista. I'll edit the article to add that in.
There's a much safer way of modifying your USB-TTL cable - I do it all the time with front panel connectors in PC cases.
Instead of completely ripping off the little plastic tabs which hold the sockets in place, just slightly lever them up (I usually just use a pin but a tiny screwdriver might also work) and then slide the wire and socket out.
Then you can rearrange the pins as needed, slide them back in and not have them standing bare out in the open and a potential short circuit risk.
Any pins you aren't using can be wrapped in tape to prevent shorts.
Thanks Agent24, I was unaware that the tabs could just be lifted and not removed. Perhaps I wasn't careful enough, but I couldn't seem to get them to move without breaking them!
Yeah they usually only need to be lifted slightly, 1mm or so.
I find a pin or needle works the best
Then again perhaps the plastic used to make the one you have is more brittle..
Hey, nice article! A comment and a question:
IRT the your TTL-USB cable, check out these male-to-female jumper wires at the Sparkfun link below. I use the exact same USB-TTL cable on all my routers...but since the pin-outs are not standard, these little jumpers keep me from destroying my $20 cable!
http://www.sparkfun.com/commerce/product_info.php?products_id=9385
The question - was the pin headers already in place or did you have to install them? It would be interesting to know if Netgear installed those from the factory..
Thanks!
Gratefully, the pin headers were pre-installed from the factory :)
I recommend getting the http://se.mouser.com/ProductDetail/FTDI/TTL-232R-3V3-AJ/?qs=sGAEpiMZZMvY... cable. It is FTDI Model TTL-232R-3V3-AJ
It's MUCH more durable than the one you use/recommend. I create a bunch of labeled headers soldered an audio jack or install the audio jack on the side of the router for easy access to the CFE.
Hello,
Does this also solves the issue with the custom loaded firmware from a provider?
This because I'm arguing with my provider about the custom loaded firmware they have put on my router and that's quite wordless. This due the fact the update button is missing. So I will never be able to update the router unless something special will happen to my router WNR3500V2.
Please can someone help me out?
I do hope so.
Thanks in advance.
If your router does not support firmware upgrades through the web interface you should be able to do it this way instead.
However, it may be possible they have not only customized the firmware but also the hardware as well...
I just got a new 3500L last week.
After taking off the cover I found that Netgear decided to not install the pins on the board. They just soldered up the holes where the pins are suppose to be.
You might want to update the article to let people know the new ones have no pins.
Guess its time to learn to solder.
The article has been updated to reflect that production models of the WNR3500L do not have pinouts preinstalled. Hopefully, this will resolve confusion!
Update: I have heard that NETGEAR has been listening to posts on the forum and that the pinouts will be added on future production models as soon as possible. Look for an official post on this soon.
Hi everyone, i 'm posting because my firmware update on my wnr3500l completely failed. So the last solution for me is to debrick my router. Can anyone tell me if it's not better to buy a "TTL-232R-3V3-WE" cable instead of a "TTL-232R-3V3" because a "TTL-232R-3V3-WE" cable has no connector at serial end ?
thanks for reply
fabien,
What firmware did you have on it and what did you try to upgrade to?
Can you Ping the router at all?
Regarding what you buy. Do you know if your router has the pinouts?
Hi, I had dd-wrt V24 SP1 on my router and I wanted to upgrade to the Tomato Firmware.
I tried to ping my router, no answers from the router.
I tried to telnet my router, it fails.
I tried to use the recovery tool on the disk given with the router, it fails.
And at last, my router hasn't the pinouts.
fabien,
Do you have your computer setup to obtain an IP address automatically?
If you do then, and this is a slim chance, you may be able to set your computer up to use an assigned address like 192.168.1.10 and your gateway to 192.168.1.1 and then be able to ping the router.
If your router is bricked and won't load sometimes it will stop and run the CFE prompt and you can TFTP a file to it.
Thanks BrandonC, I always have my computer setup with a fixed IP address like 192.168.1.2
I tried to get a dynamic IP adress form the router, but Windows 7 says there's no connection between my pc and the router, I got a yellow triangle, with an "Exclamation mark" inside, on the link between my pc and the router.
Next Monday, I'll buy the cable to debrick the router.
I will try with the tool on the Netgear cd once or twice again.
But I read that if the firmware was corrupted, the power light on the front of the router should be blinking fast, on my router it's solid amber as if the router was performing power-on self-test diagnostic. Is my firmware really corrupted !!!!
Maybe I should let it plugged all night long and maybe tomorrow morning, I would have a good suprise.
My guess after leaving it plugged in is that it is still the same. :)
Hi,
I tried to debrick my router, but it gets stuck at this point:
Starting program at 0x80001000
I can't get to the CFE console, here's the complete message:
CFE for WNR3500L version: V1.0.0.88
Build Date: Fri Jun 12 11:11:15 CST 2009
Init Arena
Init Devs.
Boot partition size = 262144(0x40000)
Found a 4MB ST compatible serial flash
et0: Broadcom BCM47XX 10/100/1000 Mbps Ethernet Controller 5.10.56.28
CPU type 0x19740: 453MHz
Tot mem: 32768 KBytes
Device eth0: hwaddr 00-26-F2-68-1A-16, ipaddr 192.168.1.1, mask 255.255.255.0
gateway not set, nameserver not set
Checksum mismatch:
Image chksum: 0x00000000
Calc chksum: 0x02C0010E
Loader:raw Filesys:raw Dev:flash0.os File: Options:(null)
Loading: .. 3768 bytes read
Entry at 0x80001000
Closing network.
Starting program at 0x80001000
How much time does it normally take to access the CFE ?
I've been waiting for 30 minutes and it still shows:"Starting program at 0x80001000" !!!
You have to hit "Ctrl-C" right when you are booting and see something in the console. Might have to hit it several times to catch the right spot.
I've been doing this several times and nothing happens. I also tried to plug the router in while pressing the reset button with the putty window active. It still hangs at "Starting program at 0x80001000"
I don't know what to do now except trying again and again and again.....
Just a guick note on using Minicom in Ubuntu.
Looks like the flow controll needs to be disabled for CFE to receive keypresses.
Made me worried for a while, before I could connect properly.
/Pelle
At last I've been able to debrick my router, but not exactly in the way shown on the site.
I had to make a shortcut to force the router to start the TFTP.
It took five minutes for the router to be completely recovered.
Now it's working well.
Now I can play with any firmware I want since I know what to do then to debrick it. :D
My 3500L does not have the serial header installed and I bricked the unit.... Anyone have any recommendations? I'm not opposed to attempting to solder a header on, but anyone know the appropriate header to order?
I have bricked my unit too :( In the lack header, I have soldered wires to the board. When I restart the unit it write rubish to the console (Like the baudrate is wrong) I tried several different baudrates but nothing has worked.
I'm using af ordinary USB to D-sub9 and from there to the board, could it cause the rubbish or could Netgear have changed the baudrate or other setting?
This is the first part of the output:
*ú-#1£££444444´Sª*ëWS
*ú-#1£££444444´Sª*ëy½Þ/ÃÕý3!Qc[g¿5¿#=åëm#-¿w5£åë{!!¿=-
5¿
¿¯Âåës!#7¿=¿e{¿YW¿9!%=-;'5¿5'¿3'=/åë
Comparing that to what i should be:
Decompressing..........done
Decompressing..........done
CFE for ...
The rubbish also has to identical lines, so it looks like it only slightly of, but I can't figure out what to do. Any ideas?
Greeting
Jakob
Pages