So you've gone and done it... you've bricked your WNR3500L. Nothing sinks the spirits like constantly flashing lights and endless reboot loops. However, don't lose hope or get frustrated - there's a solution to your woes, and it's called a serial console.
Before you think that this is too complicated for you, read on. It's actually quite simple, but there are several steps involved that require completion exactly as stated. Remember, you perform these steps at your own risk, but rest assured that I have followed these exact steps to great success and that you should be able to duplicate them. The instructions that follow are for use on Windows systems.
Materials Needed

- 1x Bricked WNR3500L
- Ethernet cable
- Windows PC/Laptop
- Installed TFTP client (Windows XP, 2000, and 7 have this built in. Otherwise, see step 10 for installation instructions/links)
- Teeny tiny screwdriver or similar implement
- Electrical tape (Optional, but recommended)
- USB-TTL Cable from FTDI. You can purchase one of these from Mouser Electronics. Ensure that you have model TTL-232R-3V3 specifically, or you can fry your router! See photo above.
- Torx T6 or T7 screwdriver
- Thin flathead screwdriver (Optional, but recommended)
- NETGEAR Original Firmware for the WNR3500L (Download from here and put into your C: drive).
- Patience. Some of these steps may take multiple attempts.
Step 1: Crack Open the Router

Well, don't literally crack it, unless you want a broken router! It's pretty easy to open, but be careful. Use the Torx screwdriver to remove the two screws on the bottom of the unit first.
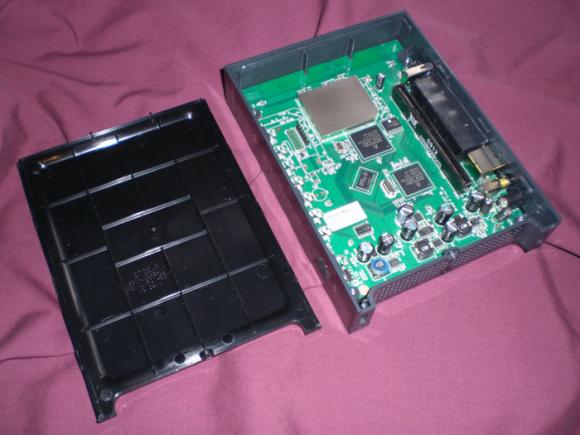
Now, you will have to unsnap the case from the router. In the photo, look closely at the router's casing. You may be able to see the tabs on the left and right side. The panel you need to remove is the "top" panel - look at the back of the router and turn it so the text is right side up. The top panel, when the router is situated this way, is the one you should need to remove. Gently put your screwdriver (preferably flathead) in the seam and disconnect these tabs. Once you are able to slide the case off, put the router aside for now.
Note: The first time removing it, I needed the screwdriver to pry it loose, but on subsequent tries I discovered that the case "slides" and snaps into place. Try various methods to find what works best for you. You may not need an implement to unsnap the tabs at all, if you're lucky!
Step 2: Download PuTTY Program and Install
PuTTY is the nifty, free little program that you will use to program the router, also known as a serial console. Download it from here, and install it using the self-installing executable.
Step 3: Download Cable Drivers and Install
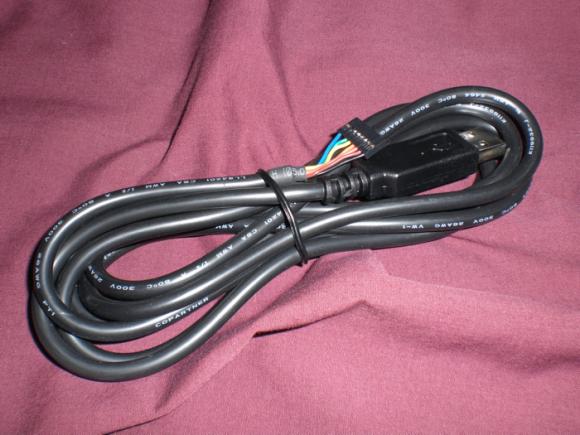
Now, you'll need to download the drivers for your USB-TTL cable. In a nutshell, this cable "converts" the USB interface of your PC to a serial output that the board of the WNR3500L can understand, so you can communicate directly with the board (i.e., not over your network.)
Download the proper driver for Windows from here and install it. A reboot is not required, but recommended.
Step 4: Give your PC a Static IP Address
This step is to ensure that you will be able to communicate with 192.168.1.1, the default address of the bricked router.
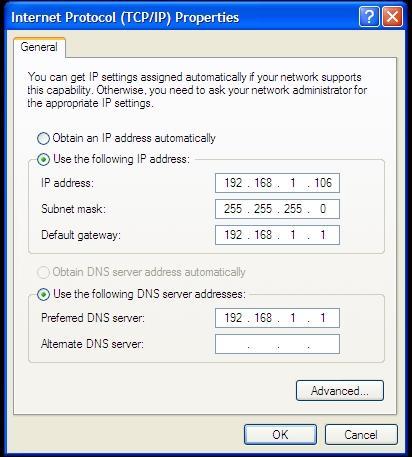
Head to Control Panel => Your Internet Connection => TCP/IP => Properties and change your IP address as shown above. Make sure it does not end in .1, .x1, or .xx1.
Step 5: Plug in Ethernet from Router to PC
Note: Do NOT connect the power to the router just yet.

Connect the Ethernet cable you have in your possession to an orange port on the WNR3500L to the Ethernet port on your PC. Note that it must be an orange port, NOT the yellow port... it won't work otherwise. At least, it didn't for me.
[[page]]
Step 6: Modify the USB-TTL Cable for Use with WNR3500L
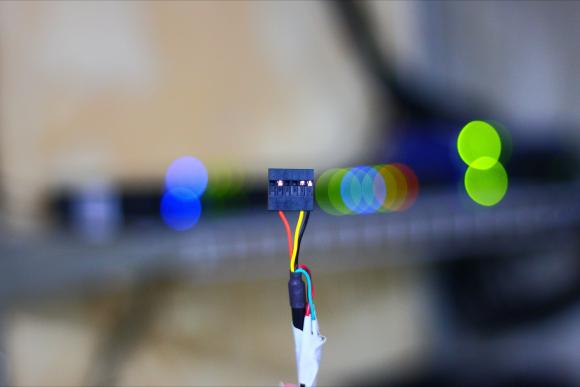
Take a look at the photo above. See how each of the leads is covered by a small plastic tab? Bust out your tiny screwdriver or whatever it is that you have that's tiny, and pry off the tabs on the black, yellow, and orange leads only. If you choose to remove all six, you will need to wrap up the unused leads in electrical tape to avoid shorting anything out. I just left the unused leads inside the plastic harness as shown above. Once you pry the tabs off, the leads that you will use slip out easily. Now, you can plug the cable in.
Step 7: Find Out What COM Port Your Cable is Using
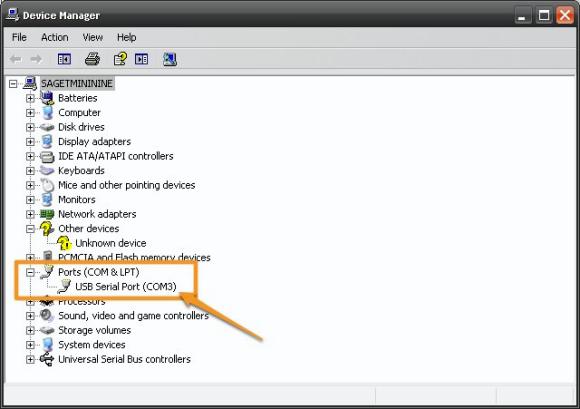
You installed the cable driver in step 3, right? If so, head on over to Control Panel => System => Hardware => Device Manager, and click on the "Ports" item as shown in the photo above. Note the "USB Serial Port" item with a designation of "COM3." You'll use this information in the next steps. If you don't see that, plug in the cable and the Device Manager should refresh.
Step 8: Connect the USB-TTL Cable to the WNR3500L
Note: Make sure the router is still powered off and unplugged from power when you do this. Don't touch anything metal either, don't want to take any risks of shock or shorting anything out, which is always a potential concern when tinkering with open electronics.

This part is particularly important, as if you don't connect these cables properly it will be very frustrating for you! Take a close look at the photo above. On the pinout on the board, you will see six pins. Next to one pin it will read "JP1." That is actually Pin 6. Pin 1 is labeled with a "1" next to it. Connect the cables as follows and as shown in the photo:
Black => Pin 6 (next to JP1)
Yellow => Pin 5
Orange => Pin 2
Note: In this photo, the black and yellow leads are seated properly. I wanted to show you what an improper cable seating looked like; the orange cable is NOT seated properly. Make sure all the cables are firmly seated to the pins and that they are not touching each other.
Step 9: Configure and Launch PuTTY
Hanging in there? Do you feel like a geek yet? It should feel good :)
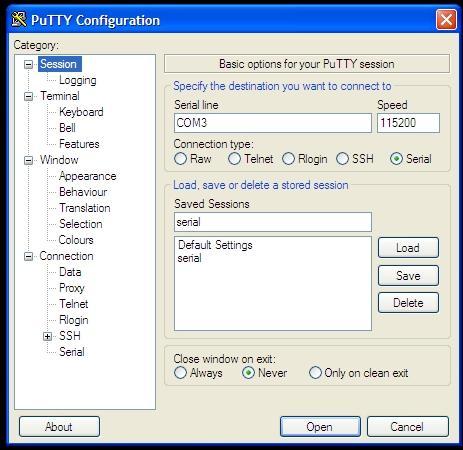
Fire up PuTTY and you'll see the screen above. Select the exact options as shown above; click on the Serial radio button, the port to COM3 (or whatever port was revealed in Step 7) and the speed to 115200.
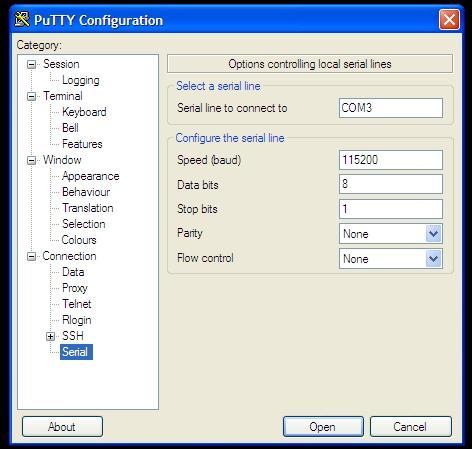
Then, click on the very last item in the menu and choose the options above. They must be exact: serial line of COM3, speed of 115200, Data bits of 8, Stop bits of 1, and "None" for both parity and flow control. Once you are confident these settings are correct, click "Open," and you will see a blank window with a green cursor. Nothing is supposed to be happening in there yet, so don't fret.
Step 9: Power on the WNR3500L and Press Ctrl-C
Now, you can finally connect power to the router. Press in the power button and immediately press Ctrl-C on your PC, with the PuTTY window active. This will bring you to what is called the CFE console; essentially, you're interacting directly with the board. If this does not happen, double and triple check all of the previous steps.

Then, type in "tftpd" (without quotes) to bring up what is called the TFTP interface. This will ready the router for programming. If this step performed properly, you'll be left with the screen above. Almost there...
Step 10: "Put" The Firmware Into Your WNR3500L In The DOS Prompt
Note: If you are on Windows 2000, XP, or 7, you have a TFTP client built in. However, if you're on Win95, 98, Me, NT, or Vista - you do not.
Instructions for installing TFTP on Windows Vista can be found here.
Here is one open source TFTP client for Windows that you can try.
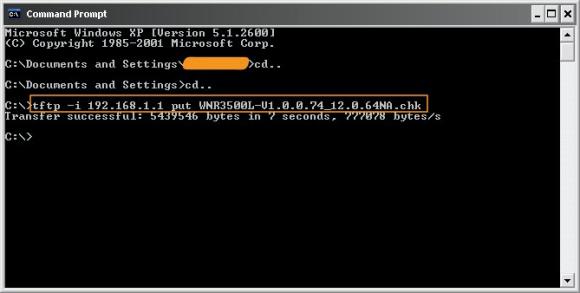
Assuming that you have TFTP installed in some form, zoom on over to your DOS prompt. You copied the original NETGEAR fimware to your C: drive, correct? Good. Type "cd.." without quotes as shown above to get to your root directory, then type this command:
tftp -i 192.168.1.1 put FIRMWARE_FILE.chk
When you do this, the TFTP command will send the firmware file you indicated to the router, and you will get a confirmation as shown above. If this doesn't work, make sure your router is connected to your PC properly, you have a static IP that doesn't end in 1, and that you can ping the router.

If this command is successful, your PuTTY console will start to get some action, and it will re-program the router. Allow this process to finish, it will take several minutes, and wait until it is COMPLETELY finished or you will get a bad flash. And nobody wants a bad flash! You'll get a lot more text than is displayed above, but when it's done, you can try accessing your router's GUI via http://192.168.1.1. You will need to enter the "standard" username and password, consult your user manual for this information. (At the time of this writing, "admin" and "password" were used.)
Step 11: Rejoice and Relax... or troubleshoot
Hopefully, not the latter, but unfortunately things don't always go as planned. If you're struggling with this procedure, have an unsolvable problem with your WNR3500L, or are on another OS let us know. We're continuing to work on recovery guides for Linux and Mac OS X, so stay tuned!
You can post your questions on the public forums or as a comment below!

You should be running at 115200 for both PuTTY and your com(x) port interface.
I'm running 115200 in PuTTY, but I didn't know I could set the baud rate elsewhere... Where can I set my com port interface? (edit have tried changing it i computer management, no luck)
Btw. did some research and found that the cheapest way to get a 3.3v ttl cable it to find an old nokia dku-5 and cut :) (or buy one cost nothing)
look here
So right now I'm trying to figure out which wire is which.... I'll report back later....
---Later---
Well found out my version of the DKU-5 needed power from the unit to work (look here, but eventually it worked. But it roughly wrote the same as my usb-dsub9...
Help
Not only do you need an adapter but you have to install the USB driver software.
I would recommend this http://microcontrollershop.com/product_info.php?products_id=2728&osCsid=... and then use their driver software.
But have you tried to do it without the serial cable yet? Ie, force your computer into a fixed IP address, try to ping router, etc?
Hi, here's a picture showing the two connectors on which I made the shortcut.

Be careful with what you do, it solved my problem, it may not solve yours.
I won't be responsible for any damage if your router gets completely out of order.
@Antoine
Mine had the same amber color, but couln't be pinged.
I got mine to work hurrah!!!
How:
By holding down the reset button while powering on (approx 1-2 minutes), then I could look at the console output that generated more output (still rubbish thoug) suddenly the amber color turned green. Afterwards I could ping and log in and it was dd-wrt who welcomed me :)
So dd-wrt had been successfully installed, something had held it from boot...
Hope you can replicate it... (so no ttl or short was required, just reset)
Jakob
Jakob, many thanks for the tip. My router had the exact same symptoms and your solution fixed it!
I've followed the guide ( I think) but the only thing I get in Putty is this:
(except I have a standard USB seriell RS232 adapter )
And no reaction on my commands.
?????
Looks like the speed problem Jakob had above. Did you try changing the baudrate?
I had already changed the COM-port settings. So, no luck.
I've tested the method he was lucky with.
I've tried the shortcut method.
Still not a respons in any way, only timeouts.
And the funny text when powering up.
@Pastill - I guess I can't help then. I have always used the USB-TTL Cable from FTDI and their USB driver software. It may cost $20.00 but it has never let me down.
I have used it both with my WGR614L and my WNR3500U and it works perfectly.
Hi
Is it posible to use a regular serial to serial cable?
(cutting it of at one end and using the correct wires)
/woundead
I'm not sure what would happed, but I don't think it's an good idea.
I guess you want to use your normal serial port on your pc, it carriers, correct me if I'm wrong, 12-15volt. TTL is only 3.3v. I wouldn't try it.
See - http://www.myopenrouter.com/article/15816/Why-Do-You-Need-A-Special-Seri...
Thanks for the article. I bricked my router on the first day.
I first tried to use the UART function of the bus pirate (which is a nice tool to have) but it looks like they do not allow to disable flow control which resulted in garbish.
I bought the TTL-232R-3V3 (If you are in germany, try rs components gmbh, they delivered mine next day!) and it worked as you described.
I had to solder my own header though, would be nice if this where already present. Seeing how easy it is to brick a unit, maybe an outside port would be cool also...
check your soldering. Ground is not connected if the router doesn't accept CTRL+C
You can do the same thing with old phone cables like CA-42 or DKU-5 much cheaper than the cable described here.
I unbricked my router using an old cell phone cable - so it works!!! I'm writing a guide now....
I am looking forward to that. It's cool to see some different and less expensive options.
It's pretty much the same. Instead I of this cable I use a cheaper old mobile phone cable.
Thanks man, shorting those connectors shown in your post worked for me.
Once again i was bored and played with usb and tomato, well it bricked.
change ip to 192.168.1.2 255.255.255.0 on laptop
cmd: ping -t 192.168.1.1
cmd2: tftp -i 192.168.1.1 PUT WNR3500L-V1.0.2.26_30.0.98.chk
when its respond to ping i did shorting those two connectors trick.
it started to upload firmware with tftp and my router was back alive :)
It will work but you might try it few time and you must use netgear stock firmware not the ddwrt one.
Hi! Fabien, you are my hero! Thank you very much! How did you find this out???
It worked for me in this way:
Performed a 30/30/30 reset.
I received Ping anwers for a few seconds after releasing the reset button. Exact in this moment did short circuit the two pins. (I did it with a screwdriver and hold it)
The result was that the ping answers keep going on. (released shortcut from the two pins)
Then I sent the firmware file with: tftp -i 192.168.1.1 put 3500.chk (to keep it simple i renamed the file 3500.chk- Netgear original firmware)
The anwer was: Übertragung erfolgreich: 5279802 Bytes in 11 Sekundens, 479982 Bytes/s
After 5 min i decided to restart the router. I got continous ping answers, but i was not able to telnet or access via browser.
So i sent the firmware again. Without doing the reset stuff, because i got already ping answers :-)
After approx. 5 min waiting the Router was up and running.
Good luck for all who are trying this, on their own risk.
Hi, I found this solution on a forum about a linksys router.
It was said that this was to clear the Nvram of the router.
I don't know if it's really true, but it helped me to debrick my router.
Glad I could help someone.
Tschuss.
The short worked for me and DD-WRT greeted me!!!!
Best Short Ever!!!
Bad new I already ordered the cable. :-(
I found two cables at ebay which one is best for debricking 3500L
http://cgi.ebay.com/2-x-PL2303-USB-TTL-RS232-Serial-Port-Converter-Modul...
http://cgi.ebay.com/FTDI-USB-To-RS232-TTL-Converter-FT232-FT232RL-3-3V_W...
@mutant,
I don't think the first one will work. It doesn't look like it has the 3.3v chip in it. The second one does look alright tho.
Hi Mutant,
The first cable won't work because it hasn't the good USB plug. This kind of plug is used to be connected to a device, it's B type and you need an A type
See here for the differences: http://www.folcom.cz/img/USB_konektory.gif
I recommend getting the http://www.mouser.com/ProductDetail/FTDI/TTL-232R-3V3-AJ/?qs=sGAEpiMZZMv... cable. It is FTDI Model TTL-232R-3V3-AJ
It's MUCH more durable than the one others use/recommend. These has lasted me a couple of years while the other ones wear out or the connectors break off after repeated usage. These are much harder to find now.... and rarely available it seems..
Thanks fabien for the tip. Shorting the two connectors worked for me. I made several attempts and only the last one succeeded.
FTDI has a 5V version w/ the various connectors pre-assembled. Go to their website, find the one you need and order it. I prefer them cuz they have the best driver support. It's too much trouble to build it from a MAXIM, in my opinion, but if you have alot of free, then good luck...
According to my multimeter, pin 1 seems to provide 3.3V. However, I still can't connect via the serial port. Since I lack the pinout I have to solder the wires and the ground pin seems fleaky. (Sigh!)
Gregor
Shorting those pins allowed me to flash the router.. no need to get a cable... mine doesn't even have the pin header in it..
Pages