So you've gone and done it... you've bricked your WNR3500L. Nothing sinks the spirits like constantly flashing lights and endless reboot loops. However, don't lose hope or get frustrated - there's a solution to your woes, and it's called a serial console.
Before you think that this is too complicated for you, read on. It's actually quite simple, but there are several steps involved that require completion exactly as stated. Remember, you perform these steps at your own risk, but rest assured that I have followed these exact steps to great success and that you should be able to duplicate them. The instructions that follow are for use on Windows systems.
Materials Needed

- 1x Bricked WNR3500L
- Ethernet cable
- Windows PC/Laptop
- Installed TFTP client (Windows XP, 2000, and 7 have this built in. Otherwise, see step 10 for installation instructions/links)
- Teeny tiny screwdriver or similar implement
- Electrical tape (Optional, but recommended)
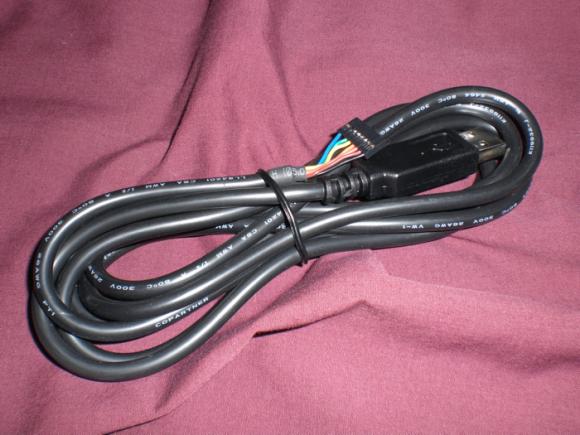
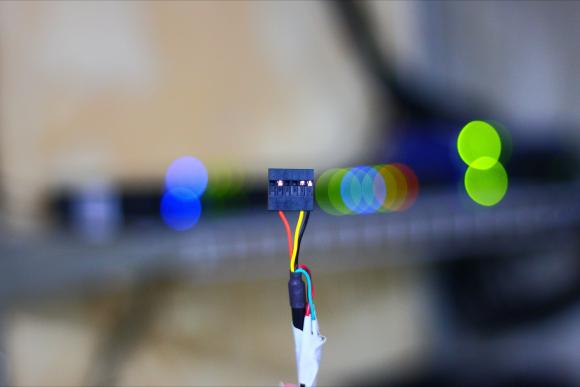
- USB-TTL Cable from FTDI. You can purchase one of these from Mouser Electronics. Ensure that you have model TTL-232R-3V3 specifically, or you can fry your router! See photo above.
- Torx T6 or T7 screwdriver
- Thin flathead screwdriver (Optional, but recommended)
- NETGEAR Original Firmware for the WNR3500L (Download from here and put into your C: drive).
- Patience. Some of these steps may take multiple attempts.
Step 1: Crack Open the Router

Well, don't literally crack it, unless you want a broken router! It's pretty easy to open, but be careful. Use the Torx screwdriver to remove the two screws on the bottom of the unit first.
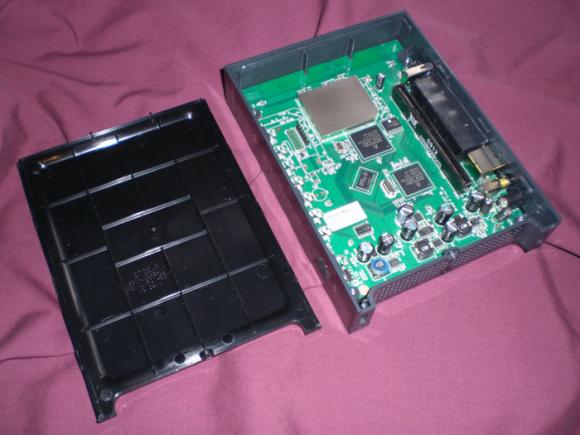
Now, you will have to unsnap the case from the router. In the photo, look closely at the router's casing. You may be able to see the tabs on the left and right side. The panel you need to remove is the "top" panel - look at the back of the router and turn it so the text is right side up. The top panel, when the router is situated this way, is the one you should need to remove. Gently put your screwdriver (preferably flathead) in the seam and disconnect these tabs. Once you are able to slide the case off, put the router aside for now.
Note: The first time removing it, I needed the screwdriver to pry it loose, but on subsequent tries I discovered that the case "slides" and snaps into place. Try various methods to find what works best for you. You may not need an implement to unsnap the tabs at all, if you're lucky!
Step 2: Download PuTTY Program and Install
PuTTY is the nifty, free little program that you will use to program the router, also known as a serial console. Download it from here, and install it using the self-installing executable.
Step 3: Download Cable Drivers and Install
Now, you'll need to download the drivers for your USB-TTL cable. In a nutshell, this cable "converts" the USB interface of your PC to a serial output that the board of the WNR3500L can understand, so you can communicate directly with the board (i.e., not over your network.)
Download the proper driver for Windows from here and install it. A reboot is not required, but recommended.
Step 4: Give your PC a Static IP Address
This step is to ensure that you will be able to communicate with 192.168.1.1, the default address of the bricked router.
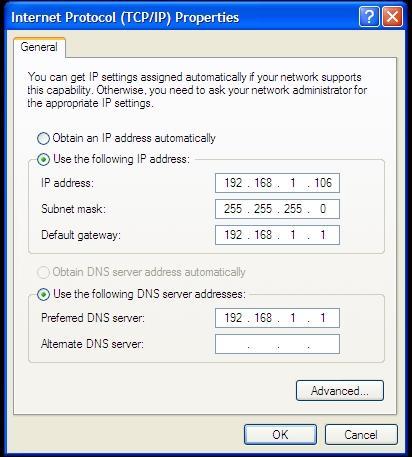
Head to Control Panel => Your Internet Connection => TCP/IP => Properties and change your IP address as shown above. Make sure it does not end in .1, .x1, or .xx1.
Step 5: Plug in Ethernet from Router to PC
Note: Do NOT connect the power to the router just yet.

Connect the Ethernet cable you have in your possession to an orange port on the WNR3500L to the Ethernet port on your PC. Note that it must be an orange port, NOT the yellow port... it won't work otherwise. At least, it didn't for me.
[[page]]
Step 6: Modify the USB-TTL Cable for Use with WNR3500L
Take a look at the photo above. See how each of the leads is covered by a small plastic tab? Bust out your tiny screwdriver or whatever it is that you have that's tiny, and pry off the tabs on the black, yellow, and orange leads only. If you choose to remove all six, you will need to wrap up the unused leads in electrical tape to avoid shorting anything out. I just left the unused leads inside the plastic harness as shown above. Once you pry the tabs off, the leads that you will use slip out easily. Now, you can plug the cable in.
Step 7: Find Out What COM Port Your Cable is Using
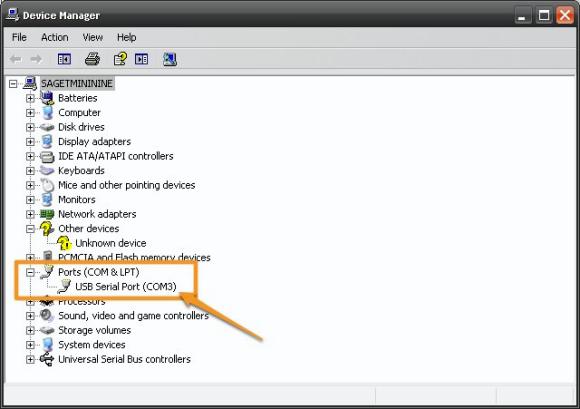
You installed the cable driver in step 3, right? If so, head on over to Control Panel => System => Hardware => Device Manager, and click on the "Ports" item as shown in the photo above. Note the "USB Serial Port" item with a designation of "COM3." You'll use this information in the next steps. If you don't see that, plug in the cable and the Device Manager should refresh.
Step 8: Connect the USB-TTL Cable to the WNR3500L
Note: Make sure the router is still powered off and unplugged from power when you do this. Don't touch anything metal either, don't want to take any risks of shock or shorting anything out, which is always a potential concern when tinkering with open electronics.

This part is particularly important, as if you don't connect these cables properly it will be very frustrating for you! Take a close look at the photo above. On the pinout on the board, you will see six pins. Next to one pin it will read "JP1." That is actually Pin 6. Pin 1 is labeled with a "1" next to it. Connect the cables as follows and as shown in the photo:
Black => Pin 6 (next to JP1)
Yellow => Pin 5
Orange => Pin 2
Note: In this photo, the black and yellow leads are seated properly. I wanted to show you what an improper cable seating looked like; the orange cable is NOT seated properly. Make sure all the cables are firmly seated to the pins and that they are not touching each other.
Step 9: Configure and Launch PuTTY
Hanging in there? Do you feel like a geek yet? It should feel good :)
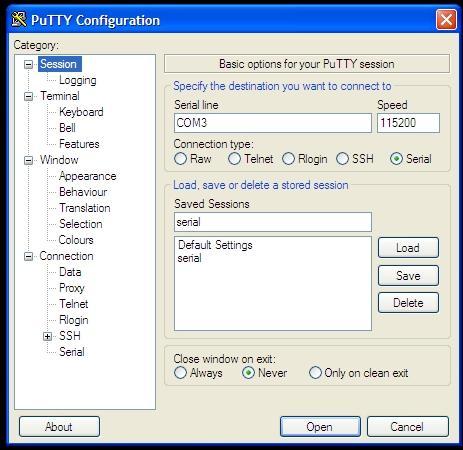
Fire up PuTTY and you'll see the screen above. Select the exact options as shown above; click on the Serial radio button, the port to COM3 (or whatever port was revealed in Step 7) and the speed to 115200.
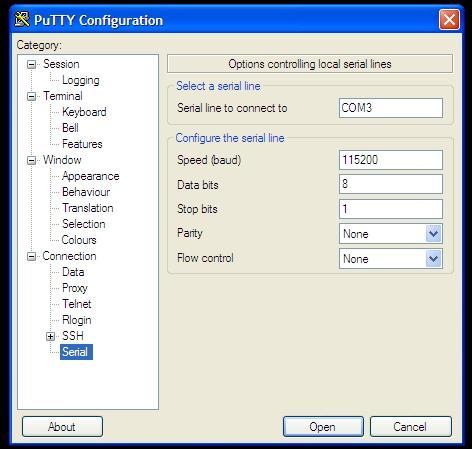
Then, click on the very last item in the menu and choose the options above. They must be exact: serial line of COM3, speed of 115200, Data bits of 8, Stop bits of 1, and "None" for both parity and flow control. Once you are confident these settings are correct, click "Open," and you will see a blank window with a green cursor. Nothing is supposed to be happening in there yet, so don't fret.
Step 9: Power on the WNR3500L and Press Ctrl-C
Now, you can finally connect power to the router. Press in the power button and immediately press Ctrl-C on your PC, with the PuTTY window active. This will bring you to what is called the CFE console; essentially, you're interacting directly with the board. If this does not happen, double and triple check all of the previous steps.

Then, type in "tftpd" (without quotes) to bring up what is called the TFTP interface. This will ready the router for programming. If this step performed properly, you'll be left with the screen above. Almost there...
Step 10: "Put" The Firmware Into Your WNR3500L In The DOS Prompt
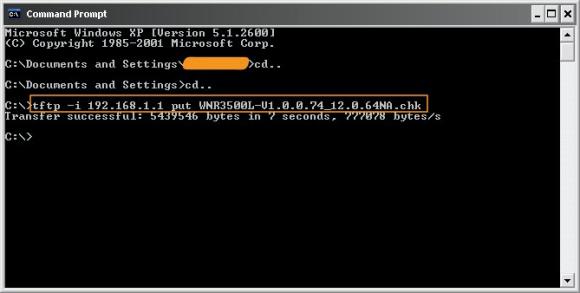
Note: If you are on Windows 2000, XP, or 7, you have a TFTP client built in. However, if you're on Win95, 98, Me, NT, or Vista - you do not.
Instructions for installing TFTP on Windows Vista can be found here.
Here is one open source TFTP client for Windows that you can try.
Assuming that you have TFTP installed in some form, zoom on over to your DOS prompt. You copied the original NETGEAR fimware to your C: drive, correct? Good. Type "cd.." without quotes as shown above to get to your root directory, then type this command:
tftp -i 192.168.1.1 put FIRMWARE_FILE.chk
When you do this, the TFTP command will send the firmware file you indicated to the router, and you will get a confirmation as shown above. If this doesn't work, make sure your router is connected to your PC properly, you have a static IP that doesn't end in 1, and that you can ping the router.

If this command is successful, your PuTTY console will start to get some action, and it will re-program the router. Allow this process to finish, it will take several minutes, and wait until it is COMPLETELY finished or you will get a bad flash. And nobody wants a bad flash! You'll get a lot more text than is displayed above, but when it's done, you can try accessing your router's GUI via http://192.168.1.1. You will need to enter the "standard" username and password, consult your user manual for this information. (At the time of this writing, "admin" and "password" were used.)
Step 11: Rejoice and Relax... or troubleshoot
Hopefully, not the latter, but unfortunately things don't always go as planned. If you're struggling with this procedure, have an unsolvable problem with your WNR3500L, or are on another OS let us know. We're continuing to work on recovery guides for Linux and Mac OS X, so stay tuned!
You can post your questions on the public forums or as a comment below!
i have shorted two pin and router is back!!!! very good system
I wonder what would happen if we kept shorting those pins. Does anyone know exactly what it does, if it potentially will cause dmg- and not due to user error.. pressing to hard etc..
I am wondering if there would be a way to actually run Gentoo on this device?
I still bought a cable though just in case we might be able to load Gentoo onto it.
My router had the same problem. Could not get int the cfe console
........ 3768 bytes read
Entry at 0x80001000
Closing network.
Starting program at 0x80001000
Thanks to the FTDI USB2Serial converter, i had some view of what was going on during startup.
The trick is to slow down the startup cycle.
Connect the router with BOTH the USB on the PCB and a Networkcable on port1-4
1. Open a windows cmd screen.
2. Open a second cmd screen start PuTTY as described above
3. Goto the first cmd screen and type ping -t 192.168.1.1
4. Set the focus in windows on the second cmd screen with PuTTY.
5. Switch on the router
6. Hit Ctrl C
Because of the ping command the startup is slowed down just enough to let you interupt the startup cycle.
I had to do it several times, focus on the wrong windows etc....
But in this way its easier to enter the CFE modus, where you could start up the tftpd.
After entering the CFE modus switch back to the first windows cmd screen, stop the ping command by pressing Ctrl C en start up TFPD -i 192.168.1.1 yourflashfilename.chk
I had to try it several times before the programming started, but now I am the happy owner of a working dd-wrt Netgear router again.
Could this be the answer about pin layout ?
It's a layout for the cable I found earliar on DLPdesign.com
It sound like my earlier described problem, so have you tried holding down reset while powerering up?
Maybe someone could help....
I have the forever blinking green LED like kosskossy on my WNR3500v2, but I have tried everything - different factory firmware (.chk), shorting the two pins, and still, every time I tftp, it would just tell me success without doing anything.
If I tftp a DD-WRT .bin file, the router freezes until I do a power reset, then it's back to the blinking green light.
kosskossy,
- Yes, I have assigned static IP.
- My router comes on with the green power LED flashing, not amber.
- Pinging it gives me 100% return with TTL=100, which I read on the forums to mean it's ready to accept tftp.
- Every time I tftp a .chk file it tells me it's successful, but it just keeps on blinking green with ping replies and TTL=100
- Guess I have a different problem than you!
I've tried sending the firmware many, many times, at different points in time after plugging in the router - no go.
I can't do erase linux again because the router has no OS and doesn't provide a telnet shell. It's stuck listening for a tftp firmware.
I found that you will need to pull up on the unscrewed end before sliding. It does come out first try rather nicely though. ;)
After xxx unlucky attempts to unbrick, following this tread and others, I once again looked in to this and followed Kosskossy's Basic's.
And .... BANG !
Router is now up and running as nothing ever have happened.
@Dean - I can't agree with you enough. It would really make it a LOT easier to perform recoveries with a USB-TTL cable, without the need for soldering or opening up the case. I hope we get to see this in future products.
Many thanks to Fabian and Kosskossy for the wonderful job they've done.After flashing wrong dd-wrt i got my wrn-3500l bricked with only amber lights shining.
Following the instructions by Kosskossy i revived my router.I found that ttl cable is very hard to get in my country/Bulgaria/ and this method saved me time and money.Thanks again guys!!!!
If anyone has trouble getting the TTL cable then let me know. If I have enough requests I'm willing to do a bulk order from a seller and ship out to those that need it regardless of location. UPS, Airmail (for international), and USPS (for domestic) would be available for use.
You can send a PM with the request. I'll check it periodically.
@kosskossy,
I have installed Tomato on my WNR3500v2 (after some trials and tribulations).
(You are aware of my previous de-bricking difficulties, which I finally solved with a serial connection and diagnosed a bad byte in the board_data partition of the core Broadcom firmware. Long story.)
If you have DD-WRT on your router, the linux partition that DD-WRT reserves is too small for most Tomato builds. However, beta 14 of teddy_bear's Tomato build fits. So you MUST flash with beta 14 first - after that, you can load any version of Tomato (and back to DD-WRT if you wish). Personally, I had some issues with beta 11, but YMMV. There is a "mini" version of beta 16 designed to fit on WNR3500v2 for the initial flash - but DO NOT flash this build, it bricked my router. The standard size beta 16 is fine to flash after flashing beta 14. Note that beta 16 std takes a long time to boot on Netgear routers - don't worry, teddy_bear is working on beta 17 with a fix.
Nice effort, NETGEAR.
I really do appreciate NETGEAR attempting to break the ice with the open source router. I'm sure that they understand what people are doing with their existing routers, and this is a nice way to go about it. In the future, here's what I would change:
1. Add an external serial port, even if it is wired to RJ45 or RJ11 plug. The cost of a serial transceiver is insignificant.
2. At least let the CFE bootloader perform tftp flashing within the boot_wait time. This might even be enough to ignore #1, since you can almost always recover from a bad flash / configuration with this. Pretty much every other broadcom router has this ability, and I'm not sure why this one does not.
3. Use an Atheros chipset for the SoC and wifi. This will get you a true open source driver so that you are not stuck with a particular kernel version. Broadcom has done well, but Atheros based platforms get the love from the open source community since there is no reverse engineering involved. The Ath5k and Ath9k drivers are solid, and this is why the NETGEAR WNDR3700 is well supported by OpenWrt but the WNR3500L is not.
I'm looking to get OpenWrt running on the WNR3500L, built from source. Unfortunately, the source on myopenrouter.com pulls against trunk svn on dev.openwrt.org, and it no longer patches cleanly. Sure, I could pull the same revision that the patch was made from, but it would be really nice to have everything in the OpenWrt svn.
Unfortunately, I can get a Buffalo wzr-hp-g300nh (comparable) for about the same price, and it has much better OpenWrt support.
Also, my trusty serial cable does not work with this router. I've used it on plenty of broadcom based routers without issue. It has a Sipex sp3232ebcn serial transceiver, which has always worked for me. I get garbage on the serial port, mixed in with the occasional valid serial data. I am going to verify ground again, but I don't see what the issue is.
Great guide!
I debrick my netgear wnr3500l with USB-TTL on Nokia CA-42 cable (5 wires on OTI 6858). Really, this cable is cheaper!
Thank you Peter!
Hi !
I've the same problem. Here is my solution :
Define on your pc this config:
192.168.1.10/255.255.255.0
gtw & dns : 192.168.1.1
1/ Proceed to 30/30/30 reset
2/ Copy from cdrom E:\bin\TFTP\Core\Drivers\WW\WNR3500L.chk to c:\WNR3500L.chk
3/ open cmd command in windows :
C:\>tftp -i 192.168.1.1 PUT WNR3500L.chk
Transfert réussi : 5439546 octets en 3 seconde(s), 1813182 octets/s
After, the led is orange
4/ poweroff alimentation
5/ poweron alimentation
6/ when LED is yellow blinking, enter again :
C:\>tftp -i 192.168.1.1 PUT WNR3500L.chk
Transfert réussi : 5439546 octets en 3 seconde(s), 1813182 octets/s
Please be patient few minutes (~5 minutes)
Led is Yellow, not blinking ! Router is working :)
Default firmware is not installed !
I don't know if this solution will work on all routers... but I have unbrick my router without connect any usb/ttl cable.
My method is similar to http://www.myopenrouter.com/article/13859/How-To-Debrick-Your-NETGEAR-WN... without open the box :)
Have fun ;)
Mr Xhark (http://blogmotion.fr)
Hi !
I've the same problem. Here is my solution :
Define on your pc this config:
192.168.1.10/255.255.255.0
gtw & dns : 192.168.1.1
1/ Proceed to 30/30/30 reset
2/ Copy from cdrom E:\bin\TFTP\Core\Drivers\WW\WNR3500L.chk to c:\WNR3500L.chk
3/ open cmd command in windows :
C:\>tftp -i 192.168.1.1 PUT WNR3500L.chk
Transfert réussi : 5439546 octets en 3 seconde(s), 1813182 octets/s
After, the led is orange
4/ poweroff alimentation
5/ poweron alimentation
6/ when LED is yellow blinking, enter again :
C:\>tftp -i 192.168.1.1 PUT WNR3500L.chk
Transfert réussi : 5439546 octets en 3 seconde(s), 1813182 octets/s
Please be patient few minutes (~5 minutes)
Led is Yellow, not blinking ! Router is working :)
Default firmware is not installed !
I don't know if this solution will work on all routers... but I have unbrick my router without connect any usb/ttl cable.
My method is similar to http://www.myopenrouter.com/article/13859/How-To-Debrick-Your-NETGEAR-WN... without open the box :)
Have fun ;)
Mr Xhark (http://blogmotion.fr)
I used kosskossy's method of shorting the two pins. I did not need the serial cable, but I am going to buy one just in case the shorting method does not work.
Now I do have to admit from a tech prospective, shorting is not always good and can cause more harm than good if you don't know what your doing or or make the mistake of being charged with static, etc. I would say that the serial method is much safer. I had nothing to loose cause I was within the return period.
@SirDragonx - I hear you - I've never even tried the pin short method myself! I've always found the serial cable to be indispensable.
Some good news for you I think...just bought a new WNR3500L from Best Buy and it has the pinnouts pre-soldered in. I know you mentioned earlier that they removed the pinnouts at some point but were planning on reintroducing them. Perhaps that's been done? If I can find out how to tell the version number of the router perhaps we could confirm whether or not this was a new change in the manufacturing process.
I found this site after doing a bit of digging to find a Gigabit/N-capable router that supported Tomato, which is the firmware I use on my Linksys WRT54GL right now. I want to be able to enable Jumbo Frames on it to make full use of this Gigabit network I've built here.
Thank you very much for posting this. It saved my router when I flashed a bad version of the firmware.
@Hablutzel - Love to hear that this helped you out. Keep on enjoying your router!
Hi,
I've managed to solder USB->TTL converter to my WNR3500L router.
I'm able to stop the router boot process and get an access to the serial console (CFE>)
First question:
Is there available list of the CFE prompt commands? In other bootloaders I can type "help", and I know everything. Here such hint is not available.
Another issue. I was working with DD-WRT at WNR3500L. Then I've realized, than it would be nice to give a try to OpenWRT (8.09 from myopenrouter site). Unfortunately Web GUI for dd-wrt only support bin images. So I decided to flash the router with the "USB-TTL cable less" method.
My lack of timing has caused that, I bricked my router :-)
Now I have access to the router's serial console.
I can stop boot process and see the prompt: CFE>
I'm able to start TFTP and download the WNR3500L-V1.0.2.50_31.1.25.chk image.
Unfortunately my router doesn't want to flash this image since the checksum is different.
Console output:
Boot partition size = 262144(0x40000)
Found a 8MB ST compatible serial flash
et0: Broadcom BCM47XX 10/100/1000 Mbps Ethernet Controller 5.10.56.28
CPU type 0x19740: 453MHz
Tot mem: 65536 KBytes
Device eth0: hwaddr C0-3F-0E-XX-YY-ZZ, ipaddr 192.168.1.1, mask 255.255.255.0
gateway not set, nameserver not set
Checksum mismatch:
Image chksum: 0xFFFFFFFF
Calc chksum: 0x09F603FC
Invalid boot block on disk
Above is after power-on. It is obvious, that I've erased MTD flash, but not upload any new firmware.
Reading :: Done. 5330293 bytes read
Checksum mismatch:
Image chksum: 0xDC96E81D
Calc chksum: 0x248F2119
Any hint on that? It is the comparison of checksum from image and the one calculated by CPU. They should match, but for some reason they did not.
Any help?
I tried this over and over again until I wen't totally bat-shit crazy...
I used an ubuntu 10.10 with tftp package. But no luck..
Then in pure desperation I booted up an virtual XP in VirtualBox and tried the same.
First try, the leds turned from blinking green to orange.. And now the router is up and having a nice time again..
Thanks for the Tip!
The pin shorting method worked for me! Thanks for the great tips!
Hello,
I having a problem with my network wgr 3500 I have 2 computer with windows xp and one windows 7 the main desktop is runing windows xp when i turn on my computer it not running the network it say they can not find the Ip Address and i have to set it up, on my other windows xp it have a card reader it not reading either, when i us my laptop it have a wirless it read the network very good just those two computer i having problem with it. Anyone can help me out to fix the problem.
Hi Kosskossy
I did that already. I wait like 8 mintes last night then i turn back on the rrouter nothing happen it in windows xp they were asking IP Address how can i find it in my system. also how to set it up back again
The WNR3500U I have had no pins in the place described, just holes in the board. So this method requires the soldering iron.
However, shortening the two connectors, of that memory chip really works. Worked for me on a WRT54GL as well. Must a Broadcom thing of sorts; not sure.
I found timing was of the essence though: Open a command prompt on windows or a terminal on Linux and create a permanent ping (ping -t 192.168.1.1 on windows or ping 192.168.1.1). Reboot your router. If you just laet it take its course you will see that it gives off two pings and then it is unreachable again. Reboot again. when the first ping comes you need to shorten the two pins. A screwdriver head is ideal, 2-3mm wide. after the first ping and before the second ping is gone you need to shorten the two pins and keep them shortened until you have three or four pings going. The you know it will keep going after you remove the screw driver. After that the router will receive a new image via tftp on 192.168.1.1
The thread is for a WNR3500L not a WNR3500U. There tends to be little differences in the models that may or may not make a big difference. Regardless I'm glad to see that the pin shortening trick (albeit dangerous) still works.
Pages