
If you saw my post here about the new Tomato Beta firmware for the WNR3500, you may want to give it a try for yourself.
I did, and then ran the USB support through it paces. From my testing, it not only works well but is extremly simple to setup and configure.
Here is how to set it up.
Turn On USB Support
1) Click on USB and NAS in the left hand column.
2) Click on Core USB Support
3) Turn on or off the 1.0/2.0, Printer and file system support as needed.
4) Click on Save
5 ) After saved click on Reboot in the left hand column.
6) Plug in a USB device.


If done correctly you will see your USB device shown at the bottom if the USB and NAS page and you are ready to go to the next step.
FTP Server Configuration
Setting up FTP is fairly straight forward. Don't be intimidated by all the options avaialble. For the average user most options are not needed.
Here is the quick easy way to get it going.
1) Click on FTP Server in the left hand column.
2) Click on Enable FTP Server and tell it either LAN or WAN and LAN.
3) Go to the bottom of the page and set a username and password
4) Click on Save.


That's all you need to do to have FTP access to your USB hard drive. If you want to set specific options feel free to do so. In my case the basic options work for me.
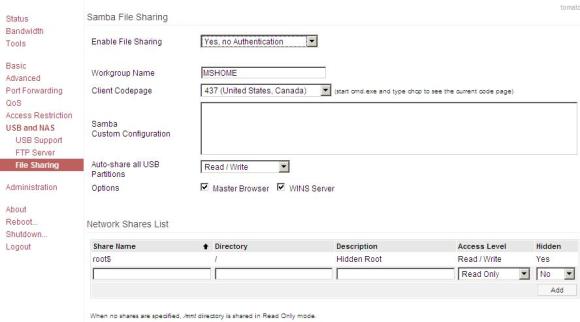
File Sharing
The File sharing option of the new Tomato firmware is where it really starts to shine. You can create a shared folder for everyone to access your USB hard drive. You can make it simple or password protected. Here's how.
1) Click on "File Sharing" in the left column.
2) Click on "Enable File Sharing" and decide if you want everyone on your network to see the files, "Yes, no Authentication" or 'Yes, Authentication required"
3) Enter your Workgroup name that you use on your computers. In my case it's MSHOME.
4) Select Client Codepage. This is not critical but I suggest you set it.
5) Decide how you want to "Auto-Share all USB Partitions.
6) Click on Save
That's basically it. Again you can setup more specific options for your needs but once you have it setup you can go to your explorer network connections and you will see your new external USB hard drive shown.
From there you can tweak the settings in Windows or on the router and create any type of virutal hard drive on your computer.
For me this is pretty sweet. I can share files back and forth between machines and I don't have to buy any new specific hardware or software to do so.
Just remember this firmware is still in Beta but IMHO, so far so good!
Any tips about how to install a 3G Usb Modem as WAN ???
Thanks a bunch,
K.
Hi,
I followed your instructions and setup my wireless router for USB sharing. I am able to access the files on a windown desktop but not able to map the network drive on a macbook. Could you please help me with that?
Prithvi
I can't seem to mount my FAT formatted USB flash disk.
I'm using tomato 1.27
See screenshot
http://img833.imageshack.us/img833/3821/failedmount.jpg
@Ferdie: I have the exact same problem. The USB disc seems to be connected, as in your case, but when I click on the mount-button I get the same answer as you.
If anyone has a solution for this I would appreciate it alot if you share your wisdom to a n00b.