
So you've gone and done it... you've bricked your WNR3500L. Nothing sinks the spirits like constantly flashing lights and endless reboot loops. However, don't lose hope or get frustrated - there's a solution to your woes, and it's called a serial console.
If you're familiar with Linux or have been a longtime Linux user, you're probably familiar with the concept. However, I'm guessing that lots of people - first timers - will be trying out Ubuntu's newest release of Linux, dubbed Lucid Lynx. If that describes you, and you're looking to recover your router on Ubuntu, you're in the right place.
Materials Needed

- 1x Bricked WNR3500L
- Ethernet cable
- Ubuntu 10.04 PC/Laptop
- Teeny tiny screwdriver or similar implement
- Electrical tape (Optional, but recommended)
- USB-TTL Cable from FTDI. You can purchase one of these from Mouser Electronics. Ensure that you have model TTL-232R-3V3 specifically, or you can fry your router! See photo above.
- Torx T6 or T7 screwdriver
- Thin flathead screwdriver (Optional, but recommended)
- NETGEAR Original Firmware for the WNR3500L (Download from here and put onto your Desktop or wherever you would like it to be located)
- Patience. Some of these steps may take multiple attempts.
Step 1: Crack Open the Router

Well, don't literally crack it, unless you want a broken router! It's pretty easy to open, but be careful. Use the Torx screwdriver to remove the two screws on the bottom of the unit first.
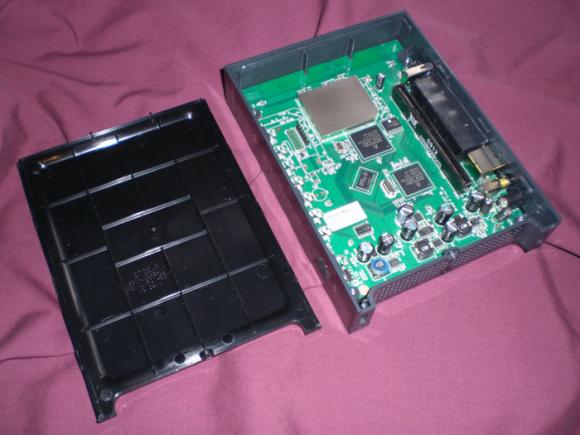
Now, you will have to unsnap the case from the router. In the photo, look closely at the router's casing. You may be able to see the tabs on the left and right side. The panel you need to remove is the "top" panel - look at the back of the router and turn it so the text is right side up. The top panel, when the router is situated this way, is the one you should need to remove. Gently put your screwdriver (preferably flathead) in the seam and disconnect these tabs. Once you are able to slide the case off, put the router aside for now.
Note: The first time removing it, I needed the screwdriver to pry it loose, but on subsequent tries I discovered that the case "slides" and snaps into place. Try various methods to find what works best for you. You may not need an implement to unsnap the tabs at all, if you're lucky!
Step 2: Install Minicom, TFTP, and the FTDI Libraries
Ubuntu 10.04 does not come with the software or drivers that you will need pre-installed, and as such, you'll have to install them yourself. Fortunately, with the Ubuntu Software Center, this is made quite simple. To begin, fire up the Software Center, accessible from the main toolbar.

I don't think the order in which you install these programs matters; I started with Minicom. Minicom is the program you will use to communicate with the WNR3500L over the serial cable interface. Simply type "minicom" into the search box as shown above, and install the minicom application by pressing the Install button.

Next, you can install TFTP, which is the program you will use to transfer the firmware file to the router once you are connected. The program you need to install is "tftpd"
 Finally, you'll need to install the libraries for the serial cable itself. If you don't, Minicom will not be able to initialize the serial interface. To do this, type "FTDI" into the search box, and install the libraries shown above.
After completing all of these steps, I would recommend a system reboot.
Step 3: Give Your Computer a Static IP
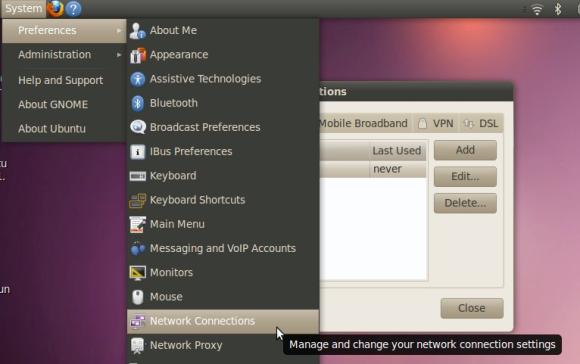
Head over to Ubuntu's network connections panel via the toolbar.

In the dialog box that pops up, give yourself an IP address that ends in .2XX or something similar - as long as it doesn't end with .1. Enter "255.255.255.0" in the Netmask setting, and 192.168.1.1 as the gateway, then click Apply.
Step 4: Connect Router Via Ethernet
Note: Do NOT connect the power to the router just yet.

Connect the Ethernet cable you have in your possession to an orange port on the WNR3500L to the Ethernet port on your PC. Note that it must be an orange port, NOT the yellow port... it won't work otherwise. At least, it didn't for me.
[[page]]
Step 5: Modify the USB-TTL Cable for Use with WNR3500L

Take a look at the photo above. See how each of the leads is covered by a small plastic tab? Bust out your tiny screwdriver or whatever it is that you have that's tiny, and pry off the tabs on the black, yellow, and orange leads only. If you choose to remove all six, you will need to wrap up the unused leads in electrical tape to avoid shorting anything out. I just left the unused leads inside the plastic harness as shown above. Once you pry the tabs off, the leads that you will use slip out easily. Now, you can plug the cable in.
Step 6: Find Out Where Your USB Cable Can Be Accessed
Open up a Terminal window, with the USB-TTL cable plugged in, and type ls /dev
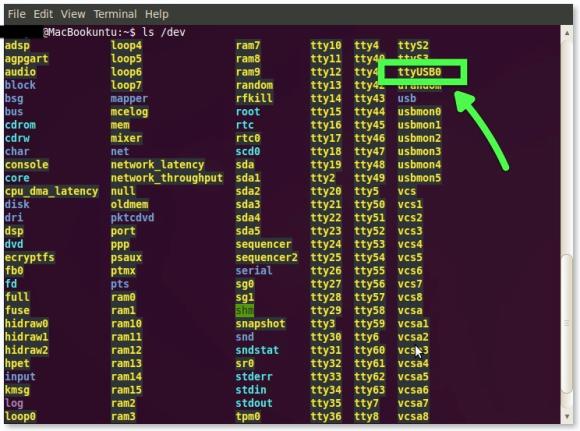
You should see a screen very similar to what is displayed above. In my case, "ttyUSB0" is my serial cable device. If you have more than one of these, unplug the cable, run the command, plug it back in, run the command again, and compare the two lists to deduce which interface is the correct one.
Step 7: Connect the USB-TTL Cable to the WNR3500L
Note: Make sure the router is still powered off and unplugged from power when you do this. Don't touch anything metal either, don't want to take any risks of shock or shorting anything out, which is always a potential concern when tinkering with open electronics.
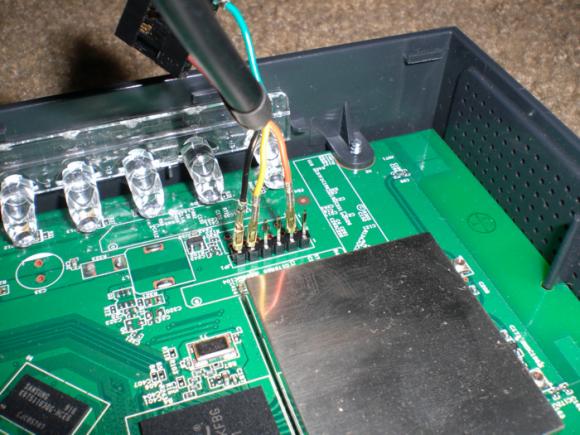
This part is particularly important, as if you don't connect these cables properly it will be very frustrating for you! Take a close look at the photo above. On the pinout on the board, you will see six pins. Next to one pin it will read "JP1." That is actually Pin 6. Pin 1 is labeled with a "1" next to it. Connect the cables as follows and as shown in the photo:
Black => Pin 6 (next to JP1)
Yellow => Pin 5
Orange => Pin 2
Note: In this photo, the black and yellow leads are seated properly. I wanted to show you what an improper cable seating looked like; the orange cable is NOT seated properly. Make sure all the cables are firmly seated to the pins and that they are not touching each other.
Step 8: Configure Minicom
Now, you'll need to configure and launch Minicom. To do this, type sudo minicom -s
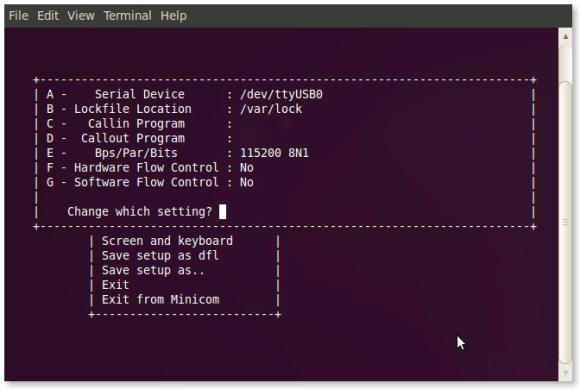
You will be brought to a configuration screen which will enable you to set the options properly. Set the options as shown above, using the device ID you discovered in step 6. After you have set the options, save the setup and exit Minicom.
Step 9: Connect to WNR3500L Via Minicom
Now, launch minicom with sudo minicom

If all is well, your USB serial device should initialize and you will be brought to a blank screen. Get your hands hovering over the Control-C buttons, power on the router, and IMMEDIATELY type Control-C numerous times. If you are successful in doing this, you will be brought to the CFE> prompt as shown above. Type tftpd and go on to the next step.
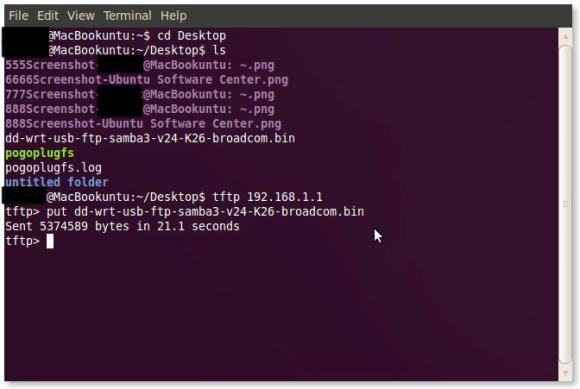
Step 10: Send the Firmware via TFTP and Reset
Open up another Terminal window and change directory to where the firmware file you will be placing is located. Then, type tftp 192.168.1.1
**Note for those running Ubuntu 10.10 64-bit** Community member pyroclast notes that it was necessary to set the binary mode prior to put transfer with TFTP (as compared to ascii mode.)
You will be brought to the tftp> prompt as shown above. Use the "put" command as shown to send the firmware file to the router, and you will be prompted when it is complete. Don't disconnect any cables while the router is reflashing, and watch the Minicom window to confirm completion. As always when reflashing a router, perform a full reset when complete.
Step 11: Rejoice and Relax... or troubleshoot
Hopefully, not the latter, but unfortunately things don't always go as planned. If you're struggling with this procedure, you can post your questions on the public forums or as a comment below!
OMG, THANK YOU!!
You saved my router. How many other router makers would make a site like this with a guide on how do fix it using Linux? None! That's how many. You guys rock! I hope you understand how grateful I am.
I wish hadn't had to solder in the pins myself. That was a bit of a pain in the ass, but worth it.
@joehillen - Glad you were able to get your router back up and running, we love to help! From what we heard from the folks at NETGEAR, the newer runs of the WNR3500L might have the pinouts included. I imagine that in any future versions of the router, based on feedback here and elsewhere, that they'll be included.
Thank you Peter for the how to! Just one comment, I have found for ubuntu 10.10 aka Maverick Meerkat (64 bit), ensure you set the binary mode prior to put transfer with tftp. For me, the default was set to ascii which made this a "fun" two day adventure. I was able to enable the tftp server on the router and put the file but the power light did not change to yellow flashing or any other indication of it working but maintained a green flashing light. Once I made the adjustment, it rebooted and no more brick. I hope this can be a help for others running into this.
Regardless, thanks for the howto, I would not have been able to debrick without it.
You're welcome pyroclast, and thanks for the 10.10 tip. I hope that it helps others as well. I'm going to add a note in the article.
so the header you plug the cable into is soldered onto the PCB by Netgear? I don't need to solder it on myself ?
I should still be able to use my USB TTL convertor right (FT232BM chip)?
Hello new around here and I've been able to follow through with the guide until step 10 where I get a Transfer Timeout. I'm using Ubuntu 10.10.
I also saw this step which might be my problem, but I don't know what it means.
"*Note for those running Ubuntu 10.10 64-bit** Community member pyroclast notes that it was necessary to set the binary mode prior to put transfer with TFTP (as compared to ascii mode.)"
Any help would be appreciated.
I know your pain. To enable the binary or octet mode, at the tftp prompt enter "binary". Then to check to see if you are in binary mode, enter "status" at the prompt. Here is an example:
tftp> binary
tftp> status
Not connected.
Mode: octet Verbose: off Tracing: off
Rexmt-interval: 5 seconds, Max-timeout: 25 seconds
tftp>
Ensure the Mode is "octect". To see all of the commands for tftp, enter "?". Now you can run the rest of the transfer commands to debrick. Good luck!
@pyroclast Thanks for the reply, so I set it to binary and typed in status and got the readout above, except with Connected to 192.168.1.1 instead of not connected, and I'm still getting a "Transfer timed out" message. So now I'm confused as to what to do next or what my problem is.
@Reki Weird, looking around here in the top comments of the page, they trouble shoot the issue. They also talk about the electrical short method to get the router to accept connections, but I suggest to focus on what the router is doing with it's power light and follow kosskossy's instructions. My case was similar to kosskossys with the power light being soild amber. You may want to review the subsequent comments for further ideas. Hope this helps.
@pyroclast Thanks again for the help, but I still couldn't get rid of that Transfer Timed Out message after trying kosskossy's method. I'll try again tomorrow after some sleep, but after that I'll just chalk it up as a lost cause, or until I feel like trying it again in the future.
Just wanted to say thanks again for linking me to the Windows guide because I tried it on a friend's Windows 7 computer and it worked without a hitch. Thank you so much now I have my WNR3500L up and running again.
Great to hear! Too bad linux didn't work out for you with this issue but very glad you're able to use your router again. Keep up the hacking, how else do we learn :)
Hi, does anyone know if i can do the job with this module?
http://cgi.ebay.co.uk/USB-TTL-serial-adapter-module-PLT-1003-/2207379474...
Also works on 11.04. I would just add that the siding should just slide off. Try sliding it off before using a flathead screwdriver. Otherwise the instructions worked like a charm. This saved my router and my marriage :)
Haha, thanks Saad, always glad to help! I think that the experience with removing the case varies from person to person. Sometimes, I was able to just slip it off--but other times, it was pretty stubborn!
thank you for your job...and for share it!!
I am going a try...
nice job!!
thank you very much
worked well for me with ubuntu 16.04
greetings from munich
Thanks for the awesome guide!
An easier way to setup your static is ip to just run
sudo ip addr add 192.168.1.2/24 dev eth0where eth0 is the alias for your network card. You might need to remove any preconfigured ip address for the device first
sudo ip addr del 192.168.0.1/24 dev eth0where 192.168.0.1 is the preconfigured ip address.
A reboot should bring the original configuration back, though I'm not entirely sure how networkmanager handles this.
Sending firmware via tftp did not work for me. Using curl did, however. I recommend trying this:
curl -T filename.chk tftp://192.168.1.1